Project Phoenix Rebuilding: End-to-End Backup and Access Architecture

This writeup documents the full buildout of the environment, including OneDrive to S3 backup, NAS to S3 backup, lifecycle rules into Deep Archive, EC2 role permissions, non-EC2 key usage, Microsoft Entra app registrations for stable OAuth handling, and Cloudflare Tunnel for EC2, Windows, and Synology DSM. What started as “protect my own data without spending a fortune” became a full architecture exercise around identity, object storage, validation, lifecycle economics, and zero-trust access.
1. Objectives
The design goals were simple on paper:
- Back up Microsoft OneDrive reliably without refresh token problems killing long jobs.
- Back up a 100–130 TB NAS footprint in phases.
- Use object storage as the landing zone.
- Use archive storage for long-term cost control.
- Eliminate exposed ports and avoid legacy VPN dependency.
- Make the system converge over time instead of depending on one perfect transfer.
- Maintain a true disaster-recovery backup, including NAS sidecar/indexing artifacts where desired.
The final design naturally split into two planes:
Data plane
OneDrive / NAS → rclone → S3 bucket → Glacier Deep Archive
Access plane
Client → Cloudflare Access → Entra ID → Tunnel → protected service
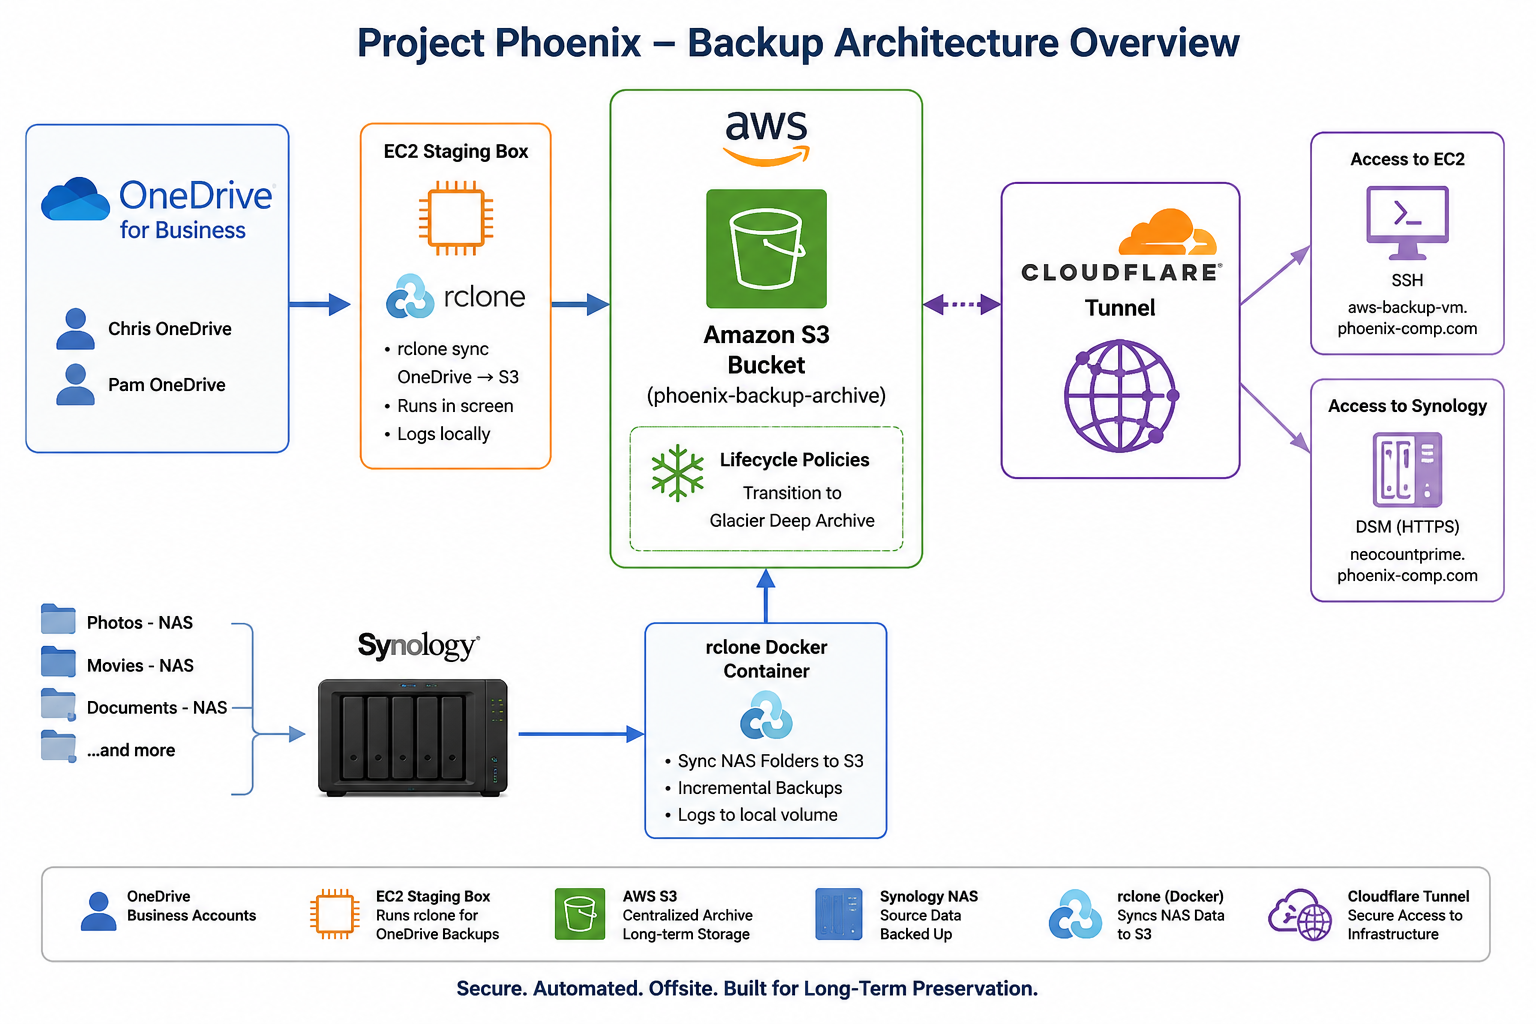
High-level architecture showing OneDrive, EC2, AWS S3 Glacier lifecycle storage, Synology NAS backups, and Cloudflare Tunnel access.
2. Core Components
- rclone
- AWS S3
- AWS Glacier Deep Archive
- AWS EC2
- IAM roles and IAM user keys
- Microsoft Entra app registrations
- Cloudflare Tunnel / cloudflared
- Synology DSM + Docker
3. S3 Bucket Layout
The primary bucket used was:
phoenix-backup-archivePrefixes were organized by purpose:
onedrive-<user1>/
onedrive-<user2>/
nas/
Under nas/, prefixes mirrored the exact NAS folder structure:
nas/Movies - NAS/
nas/UHD Movies - NAS/
nas/TV Shows - NAS/
nas/Documents/
nas/music/
nas/video/
That exact namespace symmetry mattered because it ensured future delta copies from the NAS would line up with already-uploaded content instead of duplicating or restructuring it.
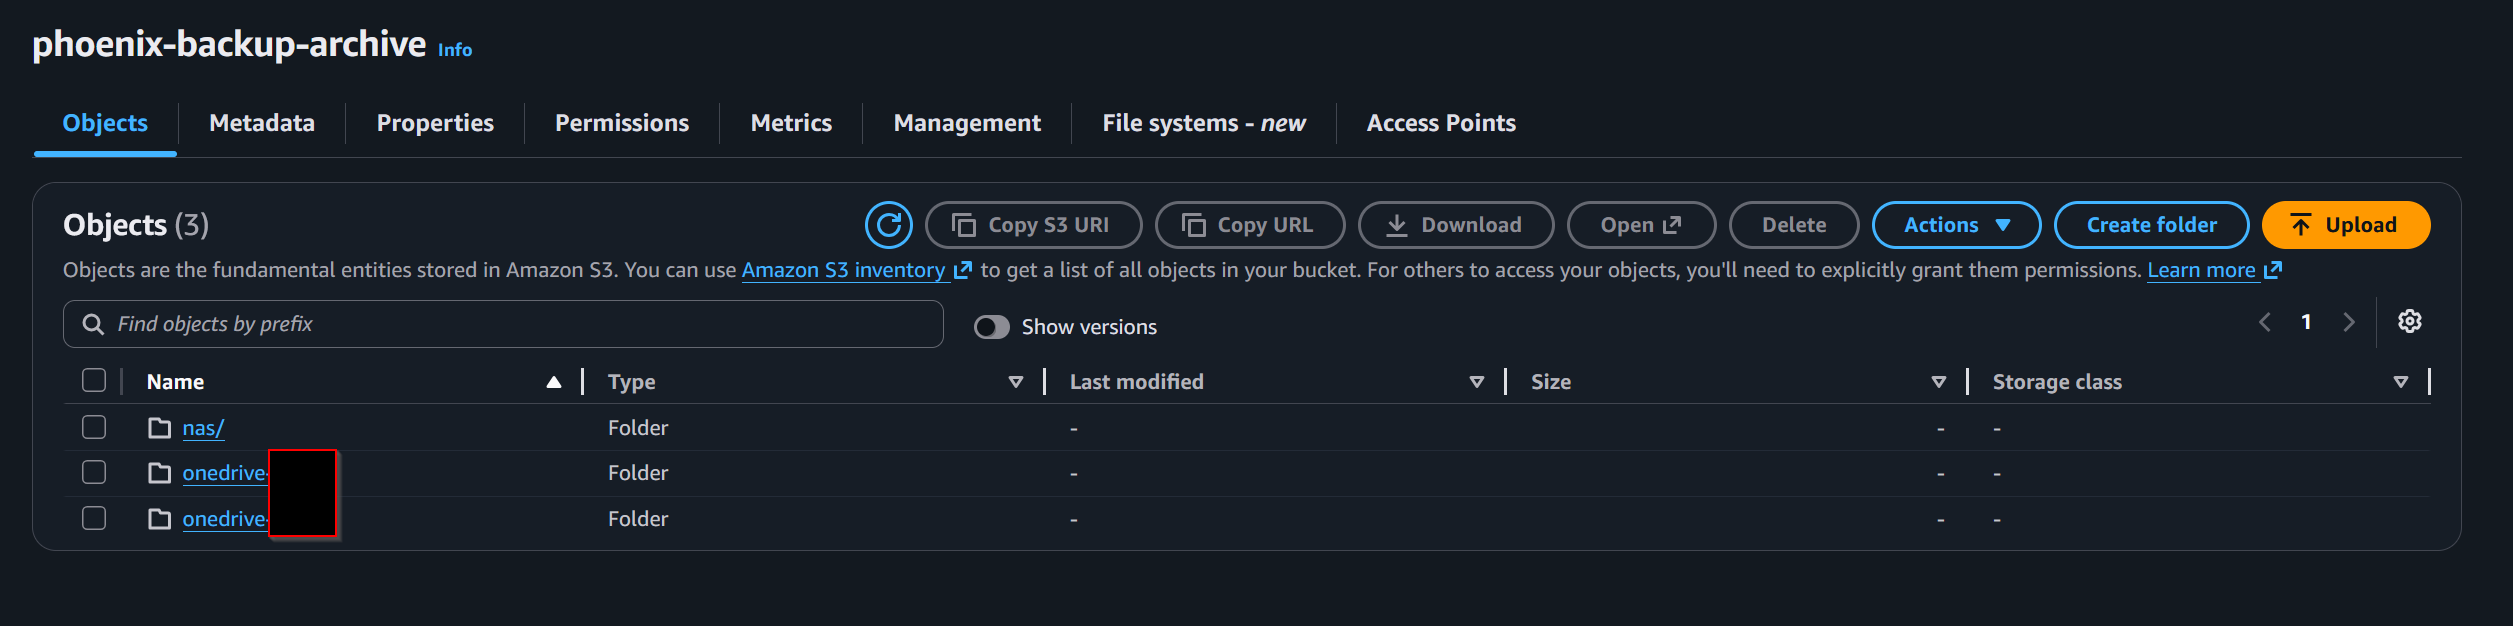
S3 bucket layout showing the top-level backup prefixes for OneDrive and NAS data before lifecycle transition into long-term archive storage.
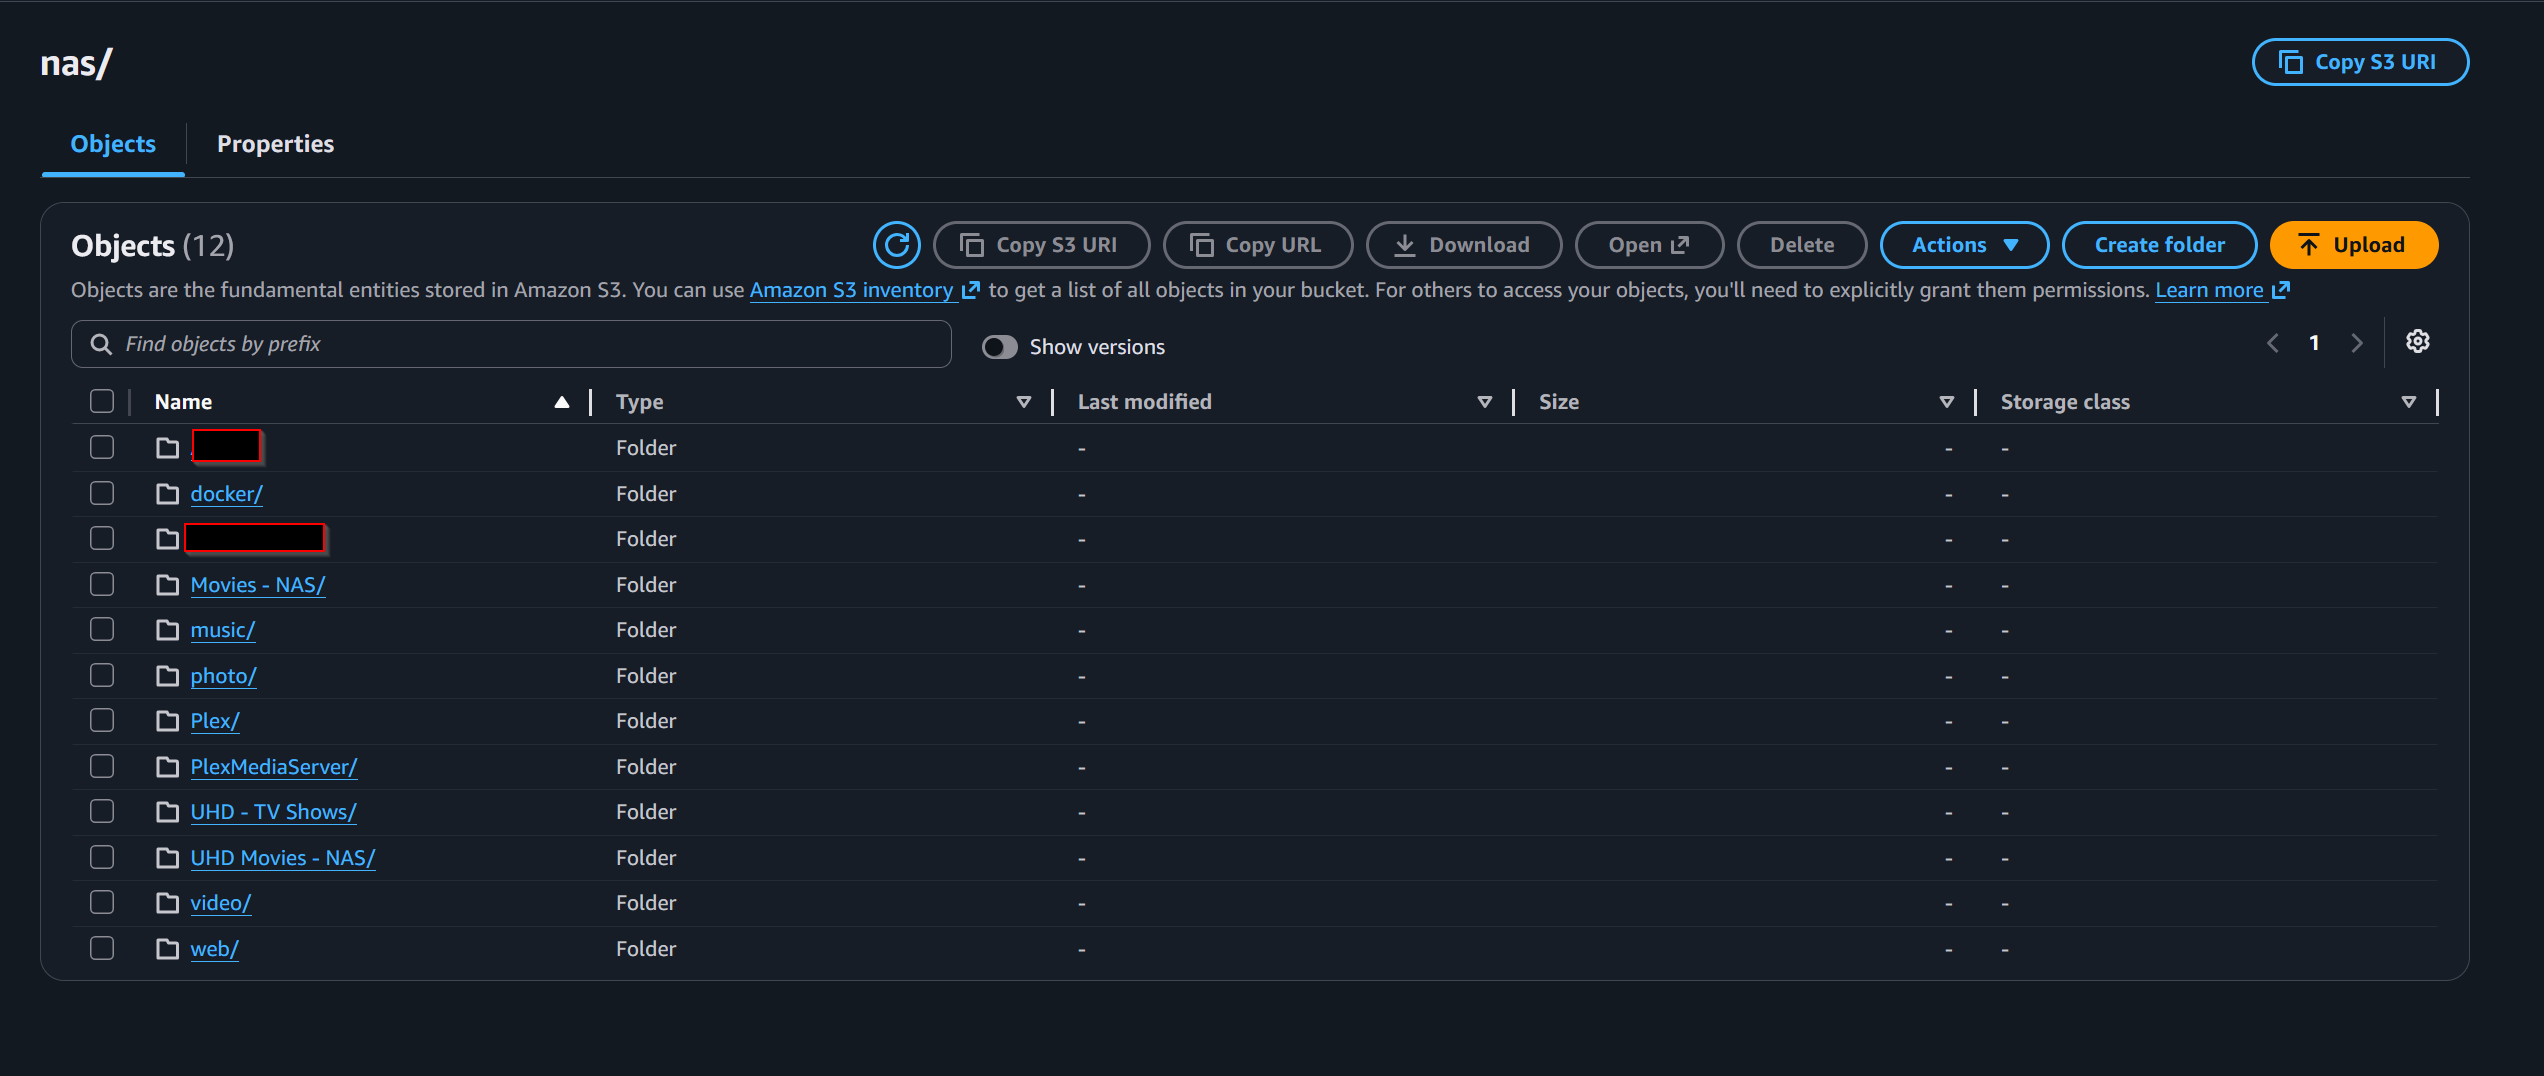
Expanded view of the NAS backup prefix in S3, showing the top-level Synology folder structure being archived.
4. S3 Bucket Configuration and Lifecycle Rules
After the bucket structure was created, the next step was locking down the bucket and defining how data would move into long-term archive storage. The bucket is private, encrypted, versioned, and governed by lifecycle rules that transition backup data into Glacier Deep Archive.
The storage cost model depended on not leaving backup data in S3 Standard any longer than necessary. S3 Standard was treated as the landing zone. Glacier Deep Archive was treated as the resting state.
The most important lesson here was that S3 lifecycle rules match on bucket-relative prefixes, not URIs and not filesystem-style paths.
Correct examples:
nas/video/
nas/music/
onedrive-<user1>/
Incorrect examples that matched nothing:
s3://phoenix-backup-archive/nas/video/
/nas/video/
Because versioning was enabled, lifecycle had to consider both current and noncurrent versions:
- Current versions → transition to Deep Archive after 7 days
- Noncurrent versions → transition later
- Optional version cleanup later
Another operational lesson: lifecycle does not run immediately when a rule is created or corrected. Objects become eligible, then AWS evaluates and processes them asynchronously. There is no “run now” button.
That meant lifecycle should not be enabled for a prefix until the copy had completed, validation had completed, and the dataset was considered ready for archive.
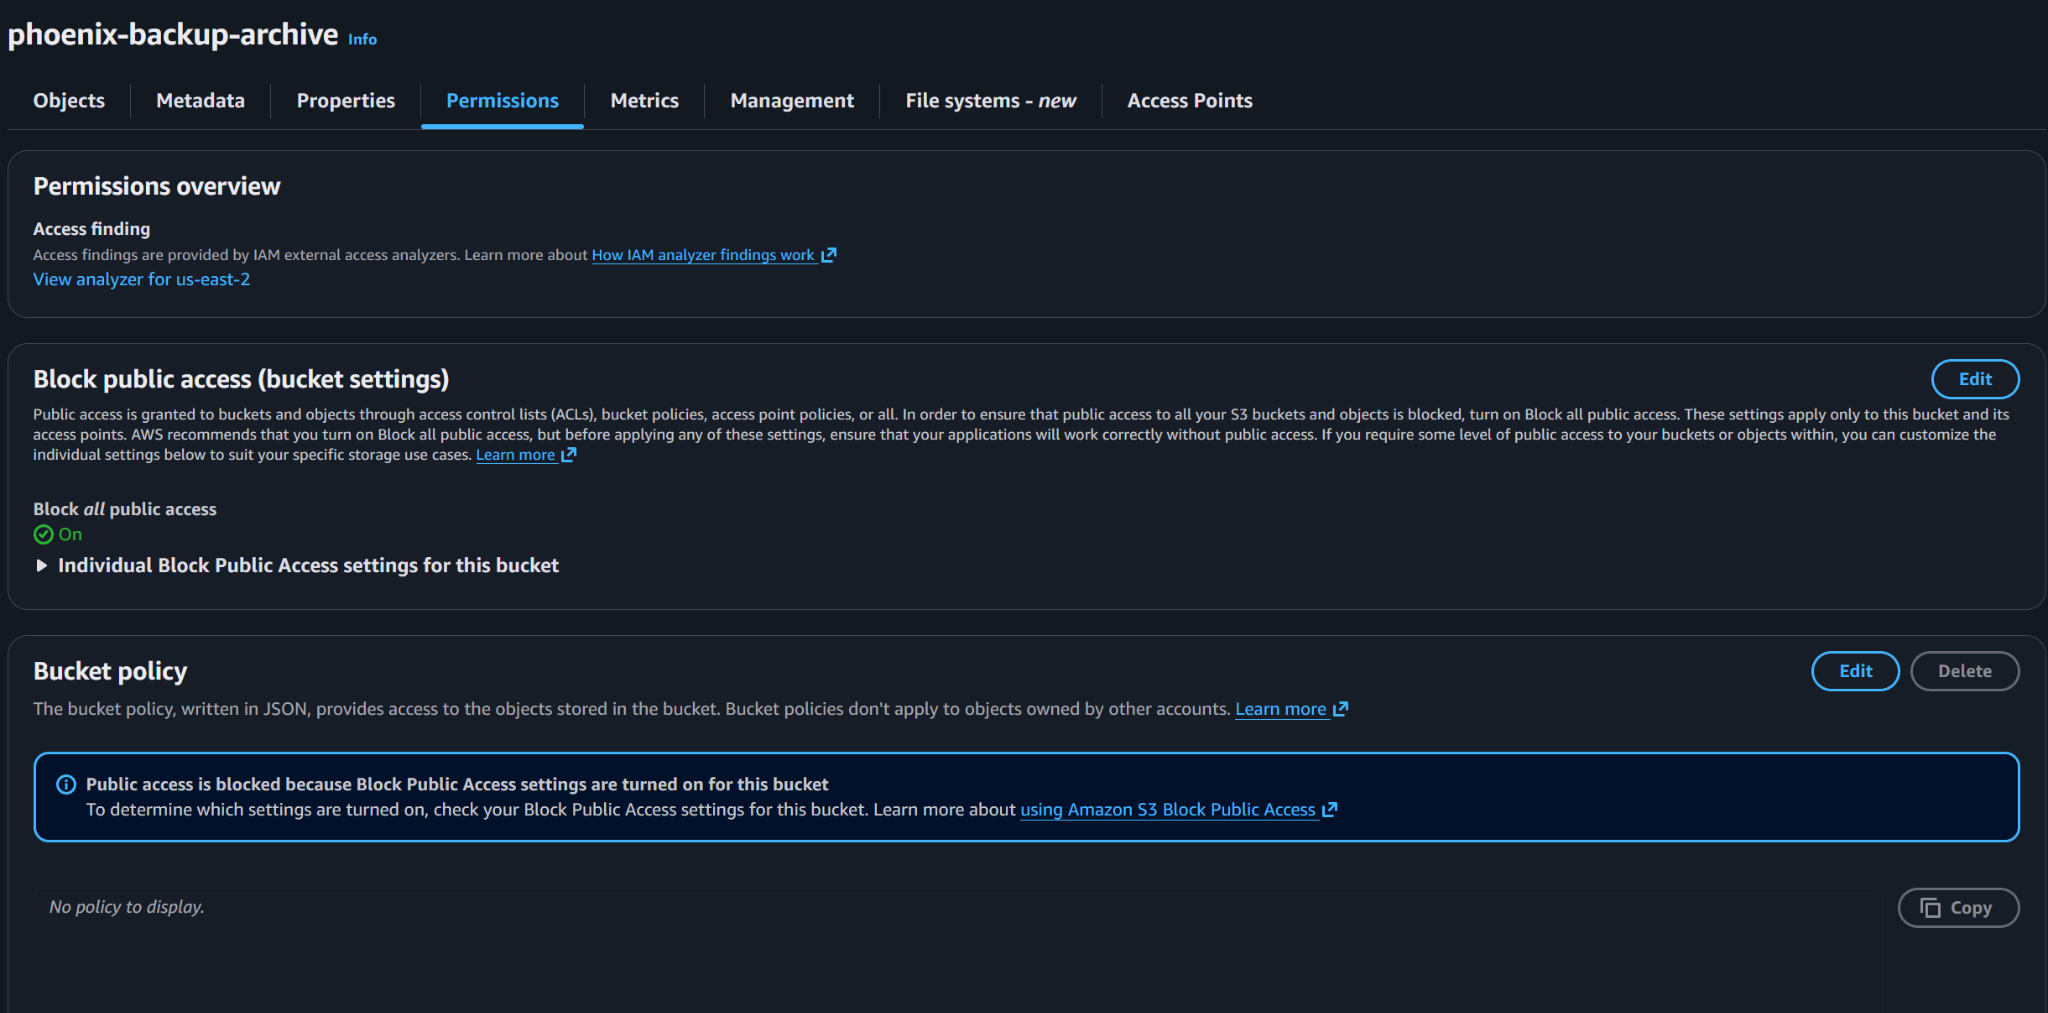
Block Public Access is enabled to prevent accidental public exposure of backup data.

Default server-side encryption is enabled so new objects are encrypted when written to the bucket.

Bucket versioning is enabled to preserve object history and provide a recovery path for accidental overwrite or deletion scenarios.
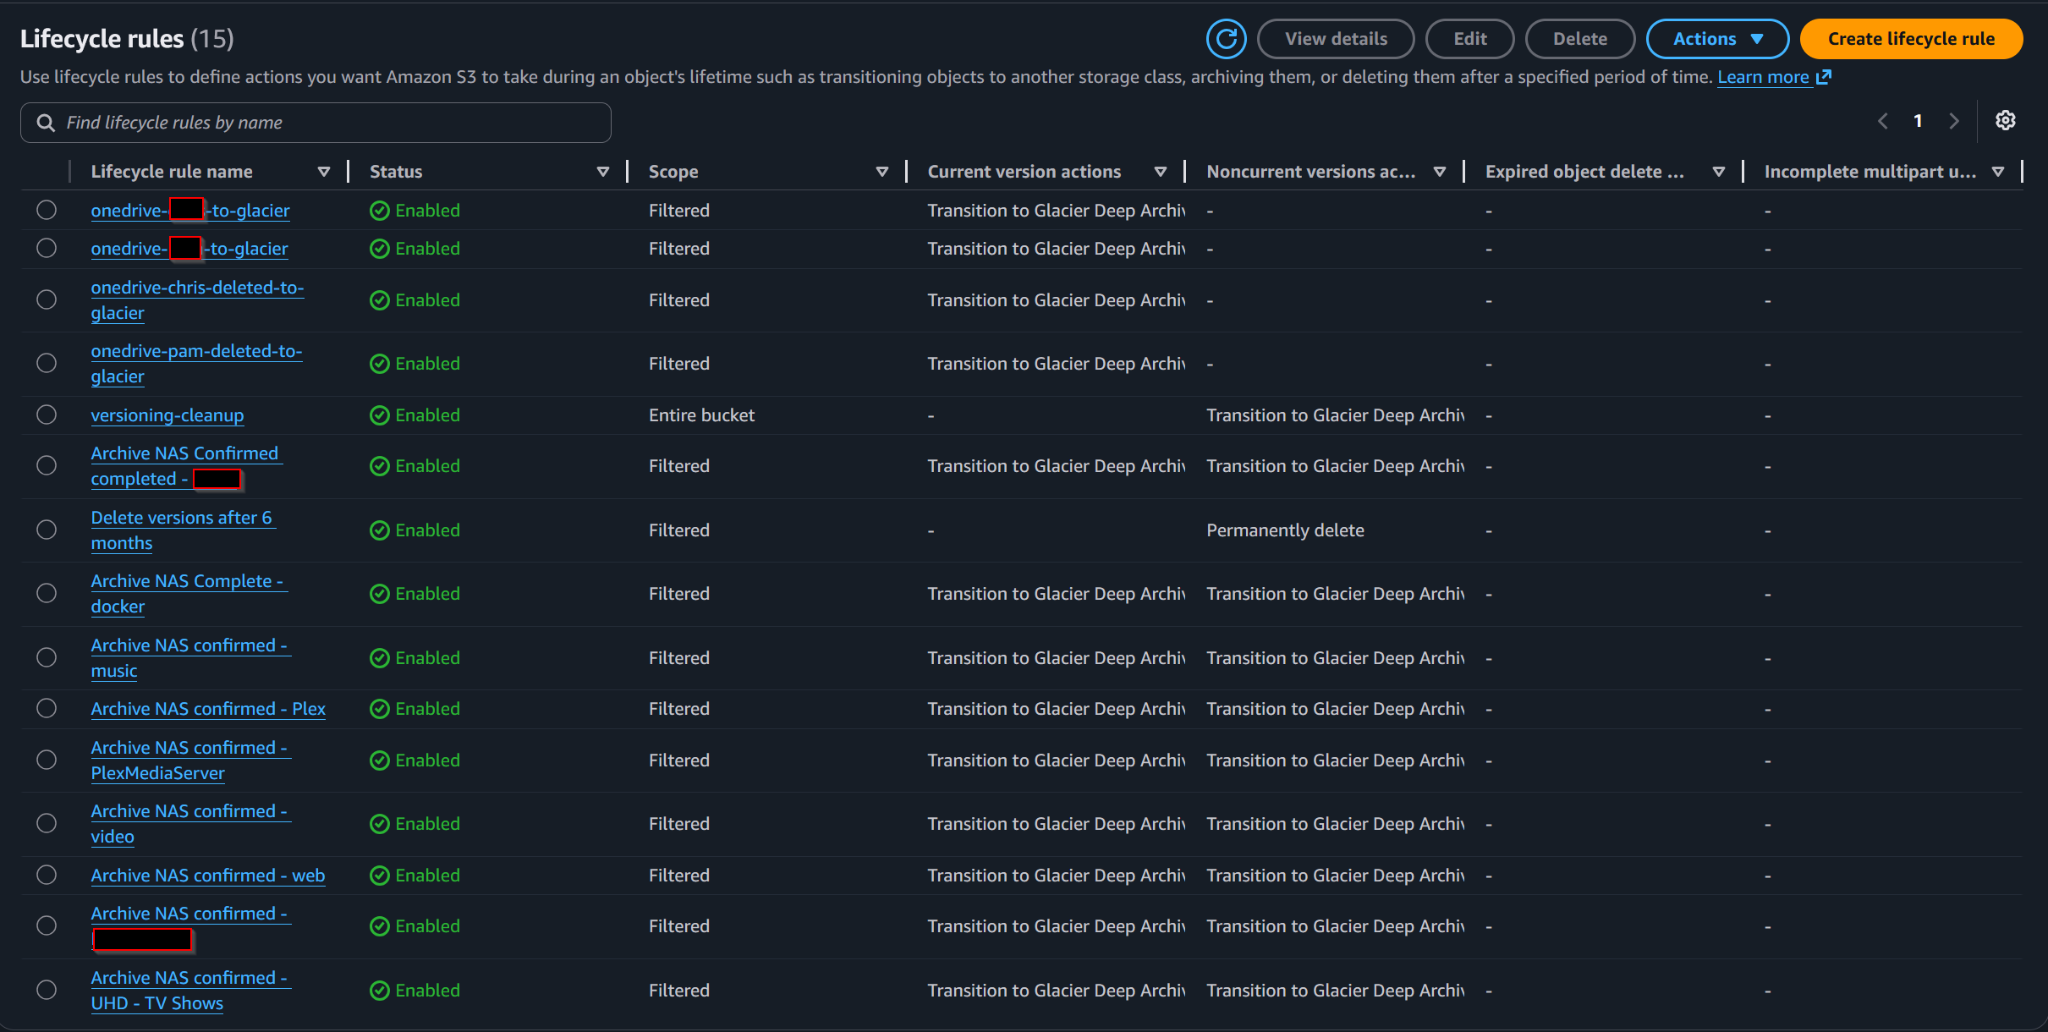
Lifecycle rules automate movement into Glacier Deep Archive and cleanup of older noncurrent versions.
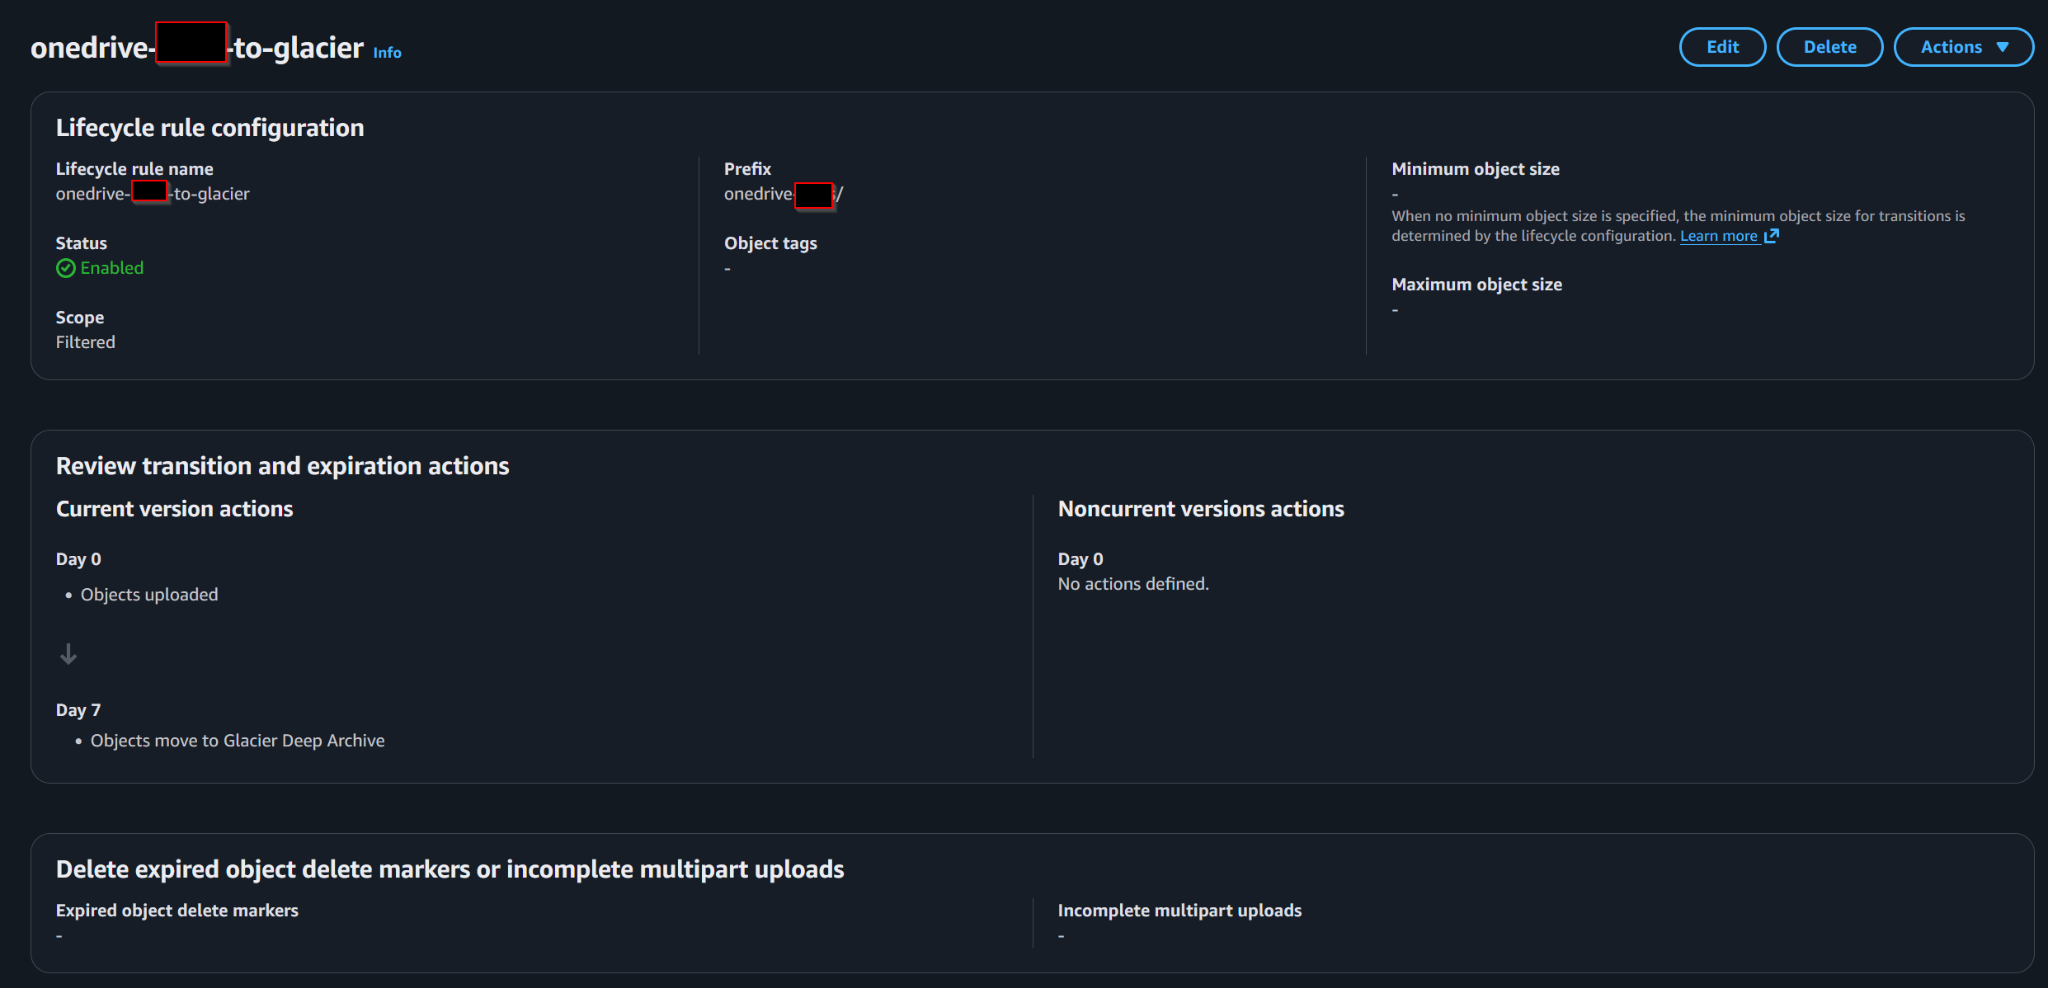
OneDrive backup prefixes transition to Glacier Deep Archive after the configured retention window.
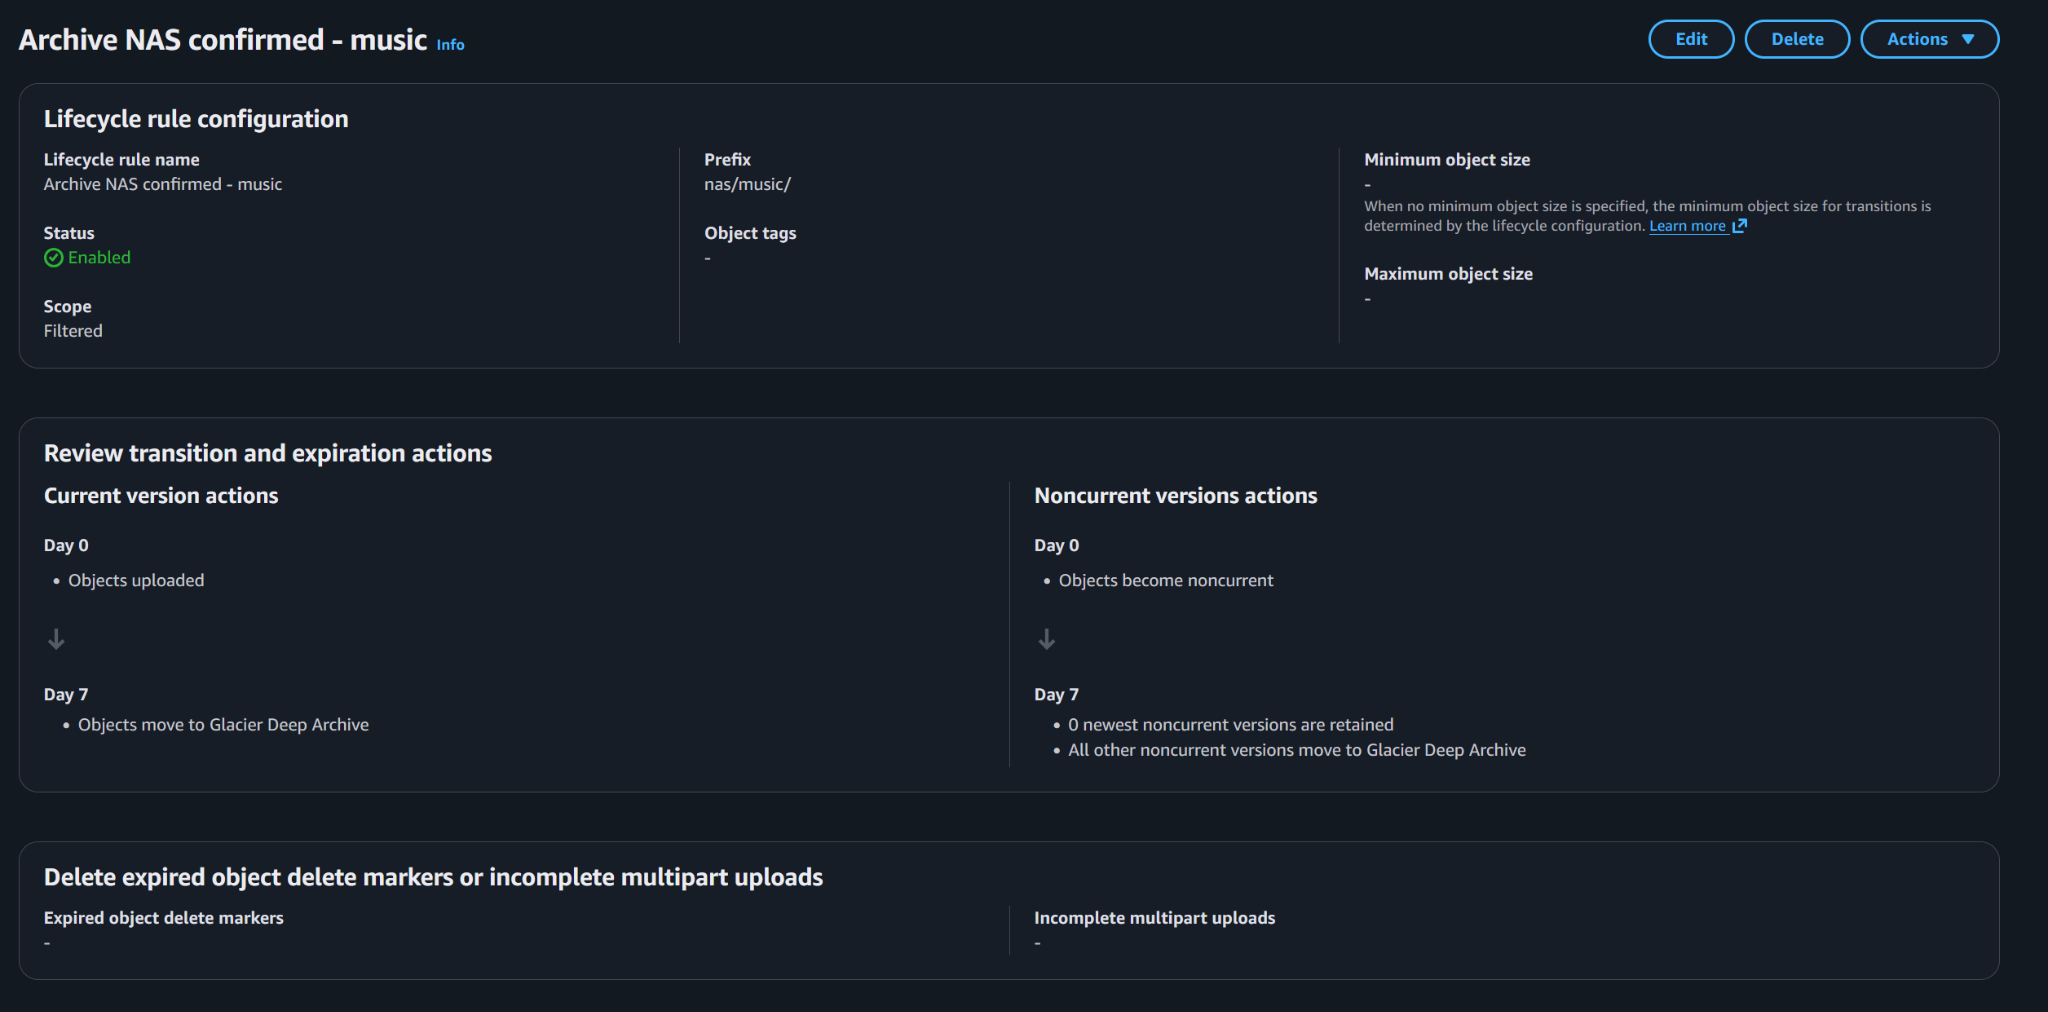
NAS backup prefixes use the same archive pattern, transitioning current and noncurrent data into Glacier Deep Archive.
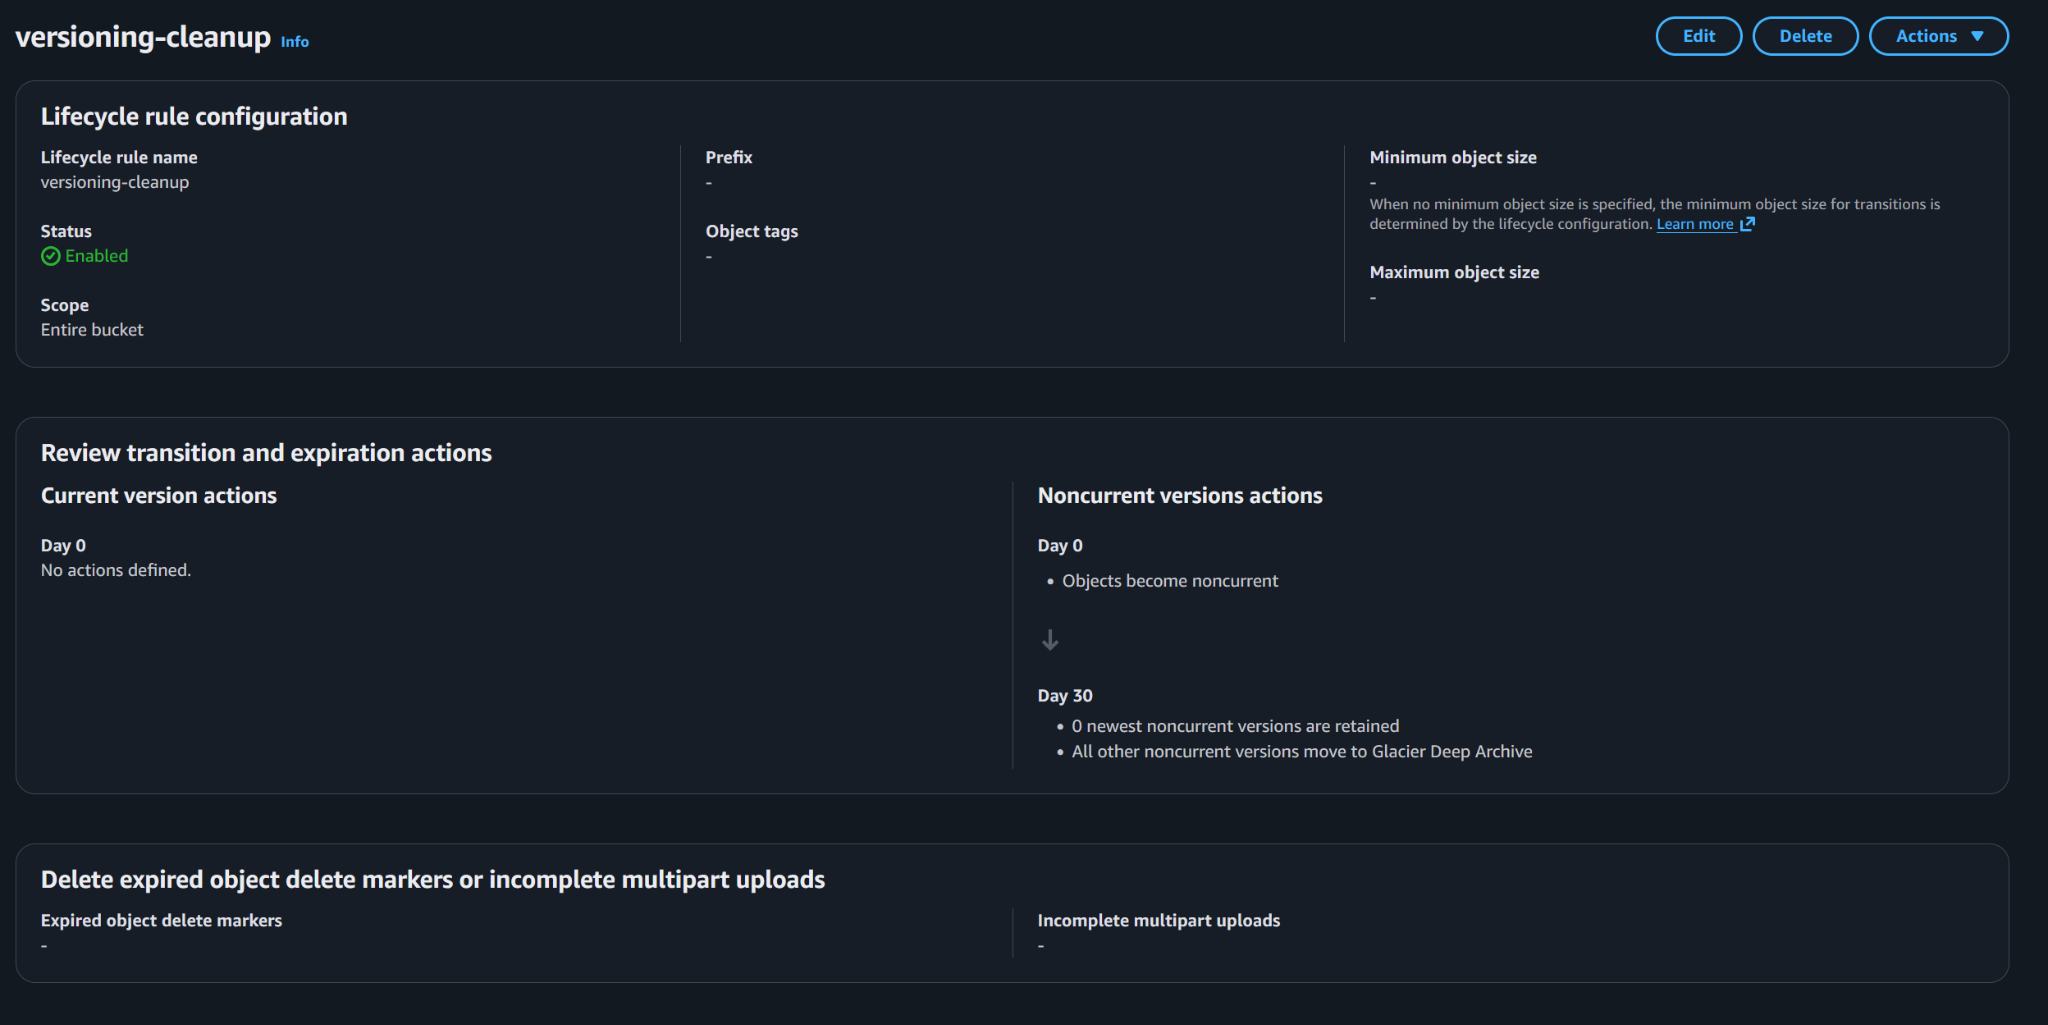
Version cleanup rules manage noncurrent object versions so the archive does not retain stale versions forever.
5. EC2 Role Permissions for S3
The EC2 instance used role-based auth, not hardcoded keys.
That meant the EC2 instance could talk to S3 using temporary credentials from the attached IAM role. The role needed permissions like:
- s3:ListBucket
- s3:GetBucketLocation
- s3:PutObject
- s3:GetObject
- s3:AbortMultipartUpload
- multipart/list permissions as needed
The EC2 S3 remote looked like this:
[aws_archive]
type = s3
provider = AWS
env_auth = true
region = us-east-2
This worked on EC2 because AWS provides role credentials automatically through the instance metadata service. It does not work the same way on a Synology or workstation outside AWS.
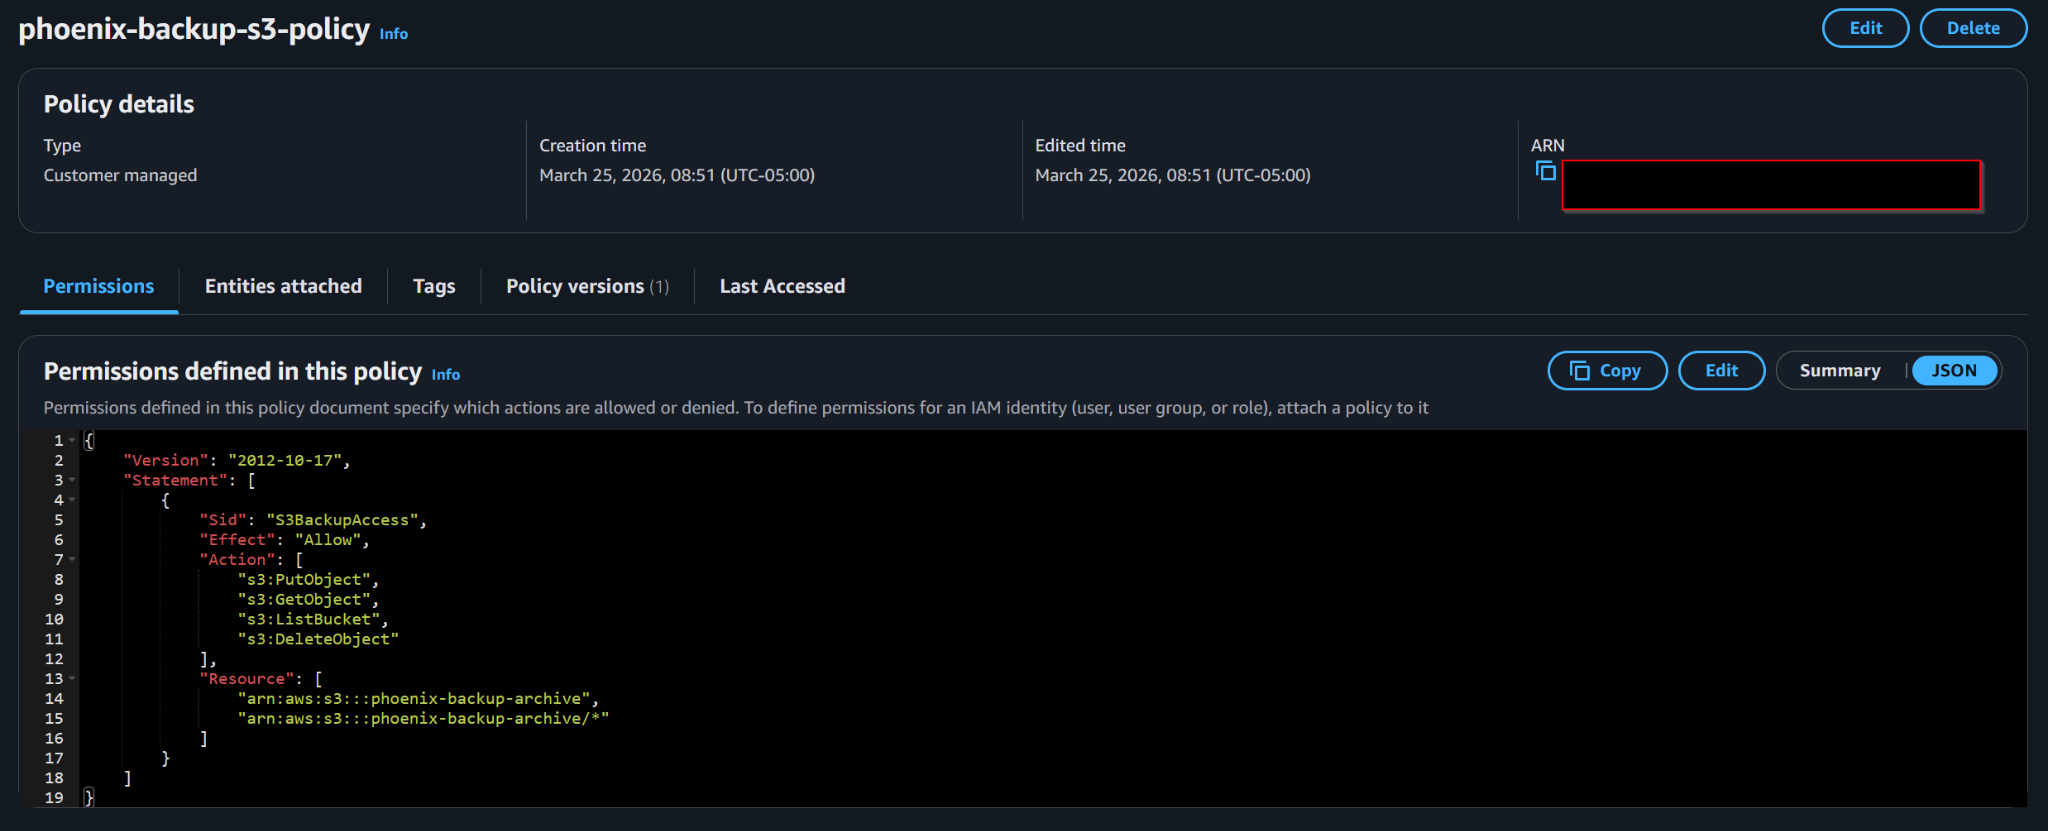
Customer-managed IAM policy granting the backup workflow access to the S3 archive bucket and objects inside it.
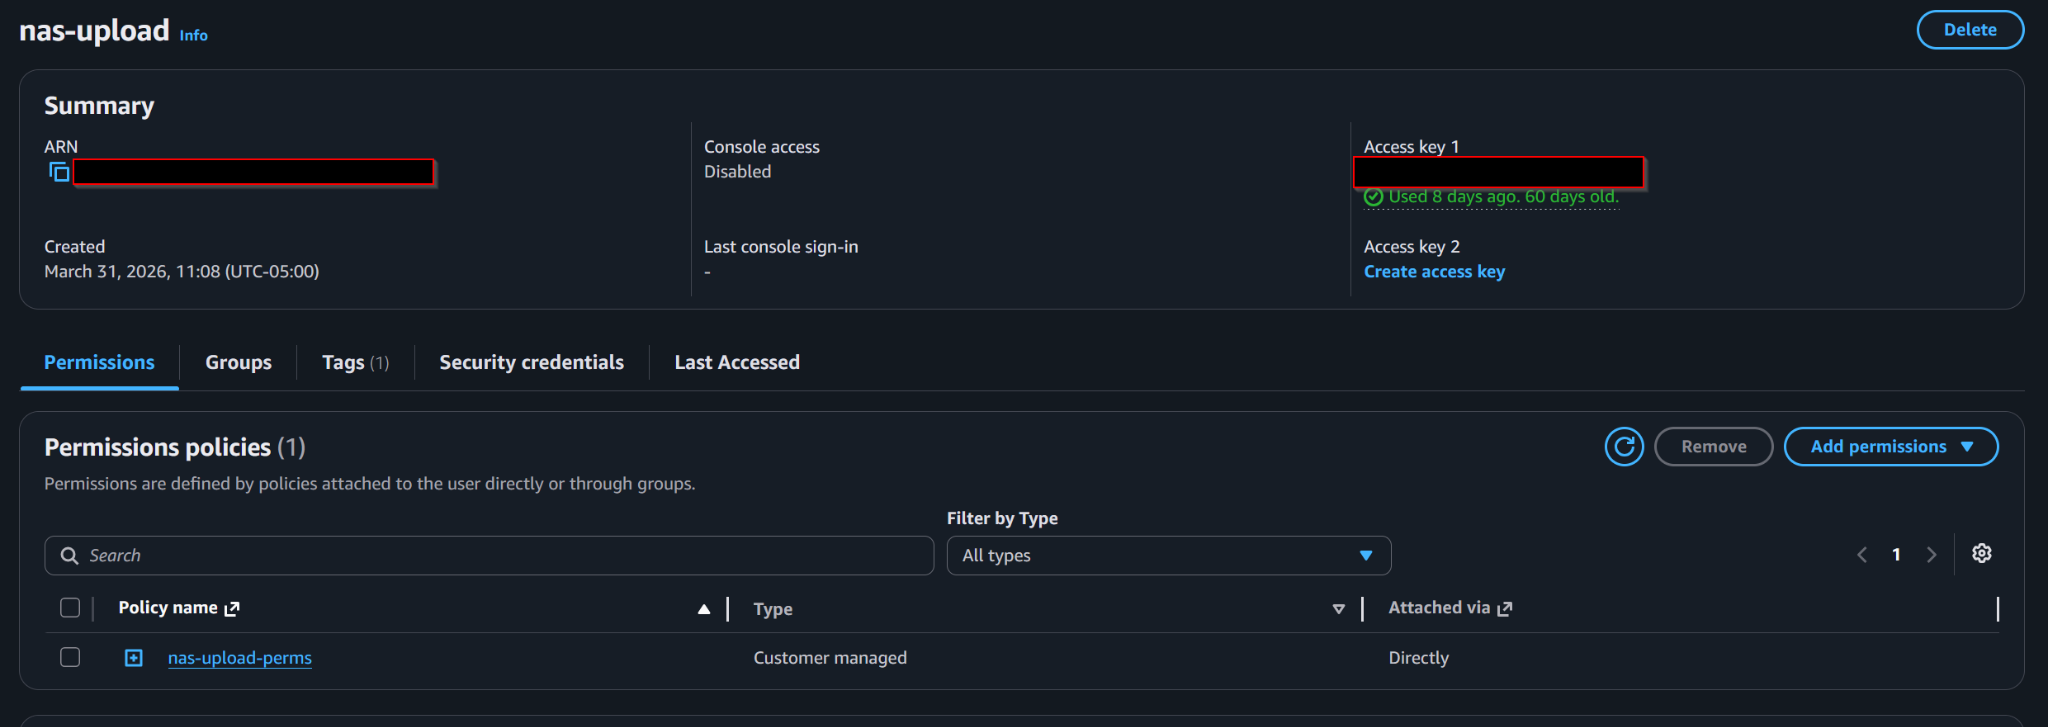
Dedicated IAM user for NAS uploads with console access disabled and the backup permissions attached directly.
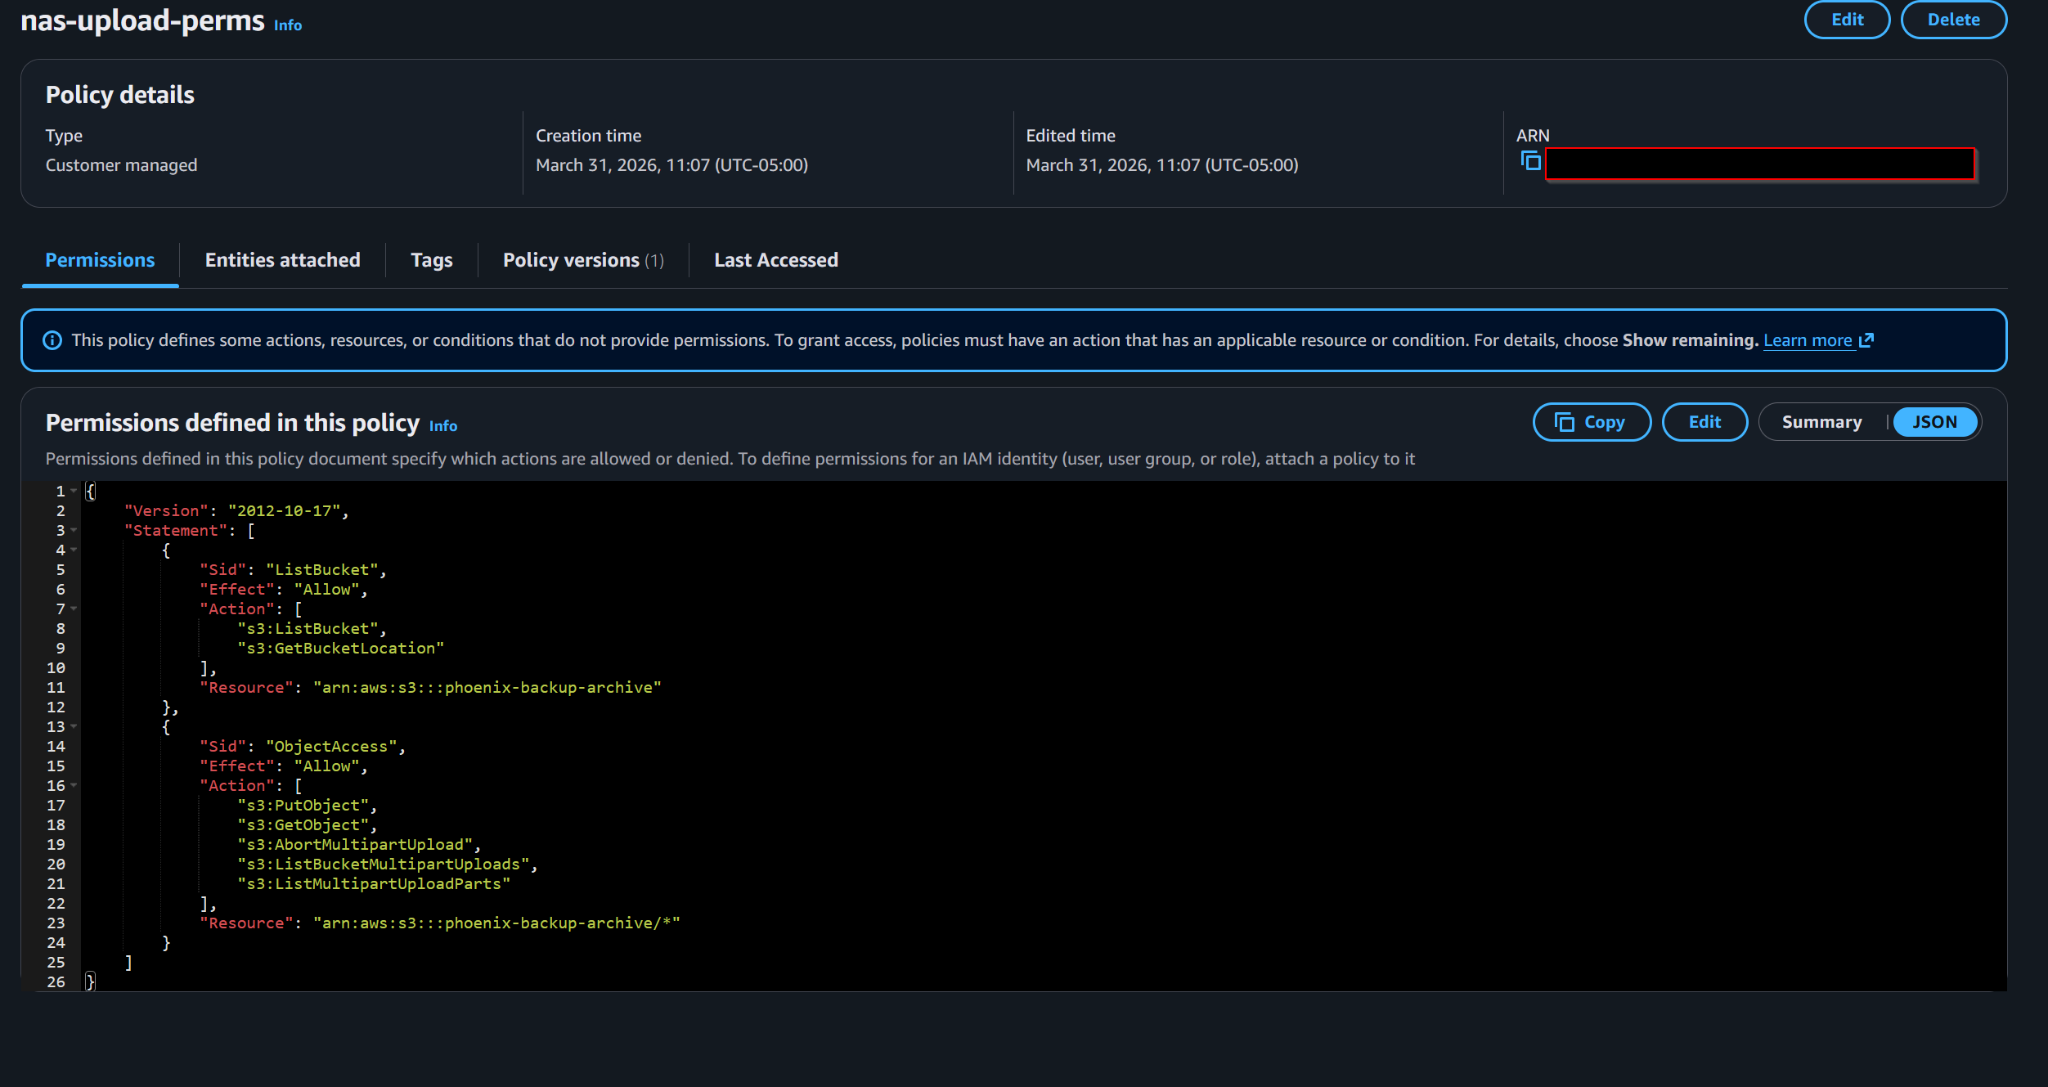
NAS upload policy scoped to listing the bucket, getting bucket location, uploading objects, and managing multipart uploads.
6. Access Key / Secret Key Usage Outside EC2
For systems outside AWS, role-style EC2 auth was not available. That applied to the Windows workstation ingest host and the Synology NAS.
So an IAM user with scoped bucket permissions was created for non-EC2 access. The handling model was straightforward:
- Create IAM user
- Generate Access Key ID and Secret Access Key
- Use those in rclone.conf on non-EC2 systems
The actual secret key is intentionally not reproduced here.
7. rclone Configuration Model
EC2 S3 remote
[aws_archive]
type = s3
provider = AWS
env_auth = true
region = us-east-2
Non-EC2 S3 remote
[aws_archive]
type = s3
provider = AWS
env_auth = false
access_key_id = <redacted>
secret_access_key = <redacted>
region = us-east-2
Keeping the remote name aws_archive the same across environments reduced command drift and made scripts portable. The remote name stayed consistent, but the authentication model changed depending on where rclone was running.
8. OneDrive Authentication Problem and Entra App Fix
Default OneDrive authentication through rclone was not sufficient for unattended long-running jobs. The transfers were large enough and long enough that token handling became a reliability problem.
Symptoms included:
- Token refresh problems
/commonendpoint issues- Refresh-token-related failures
- Long-running transfers dying before completion
The fix was to use a custom Microsoft Entra app registration and tenant-specific authentication endpoints instead of relying on the generic default flow.
Key settings included:
- Single-tenant app registration
- Redirect URI: http://localhost:53682/
- Delegated Microsoft Graph permissions appropriate for OneDrive access
- Critically included: offline_access

Custom Microsoft Entra app registration used for rclone OneDrive authentication, with tenant and application identifiers redacted.
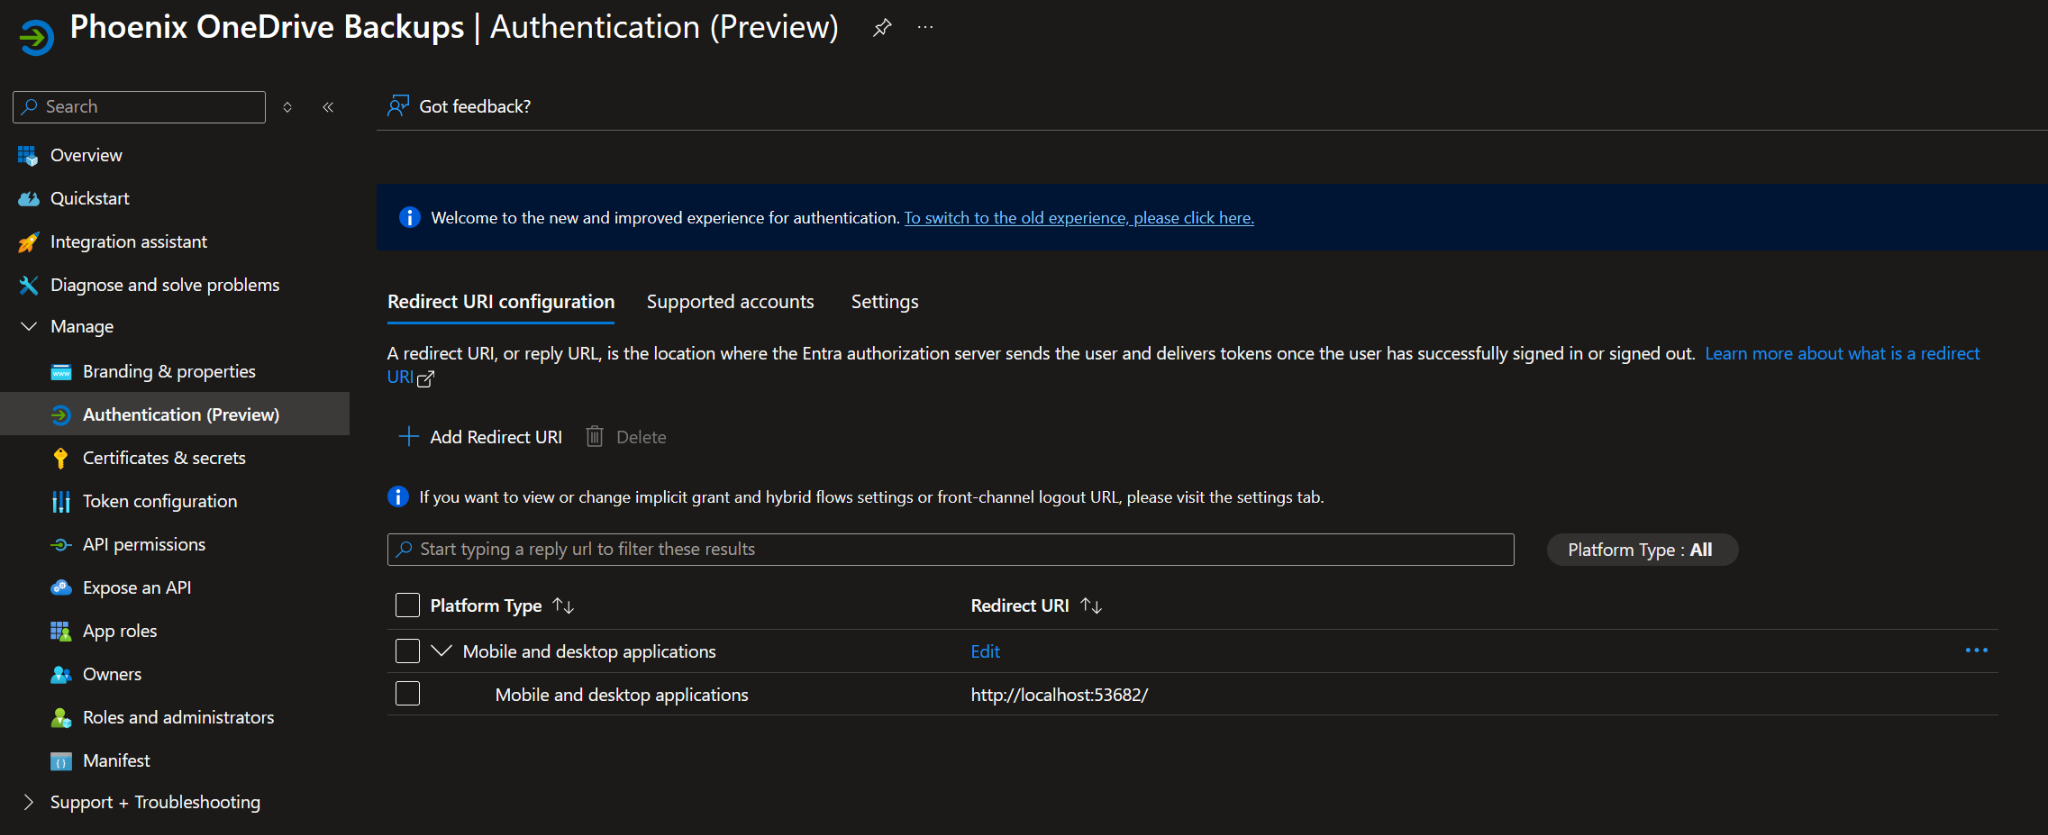
Redirect URI configured for the local rclone authentication callback.
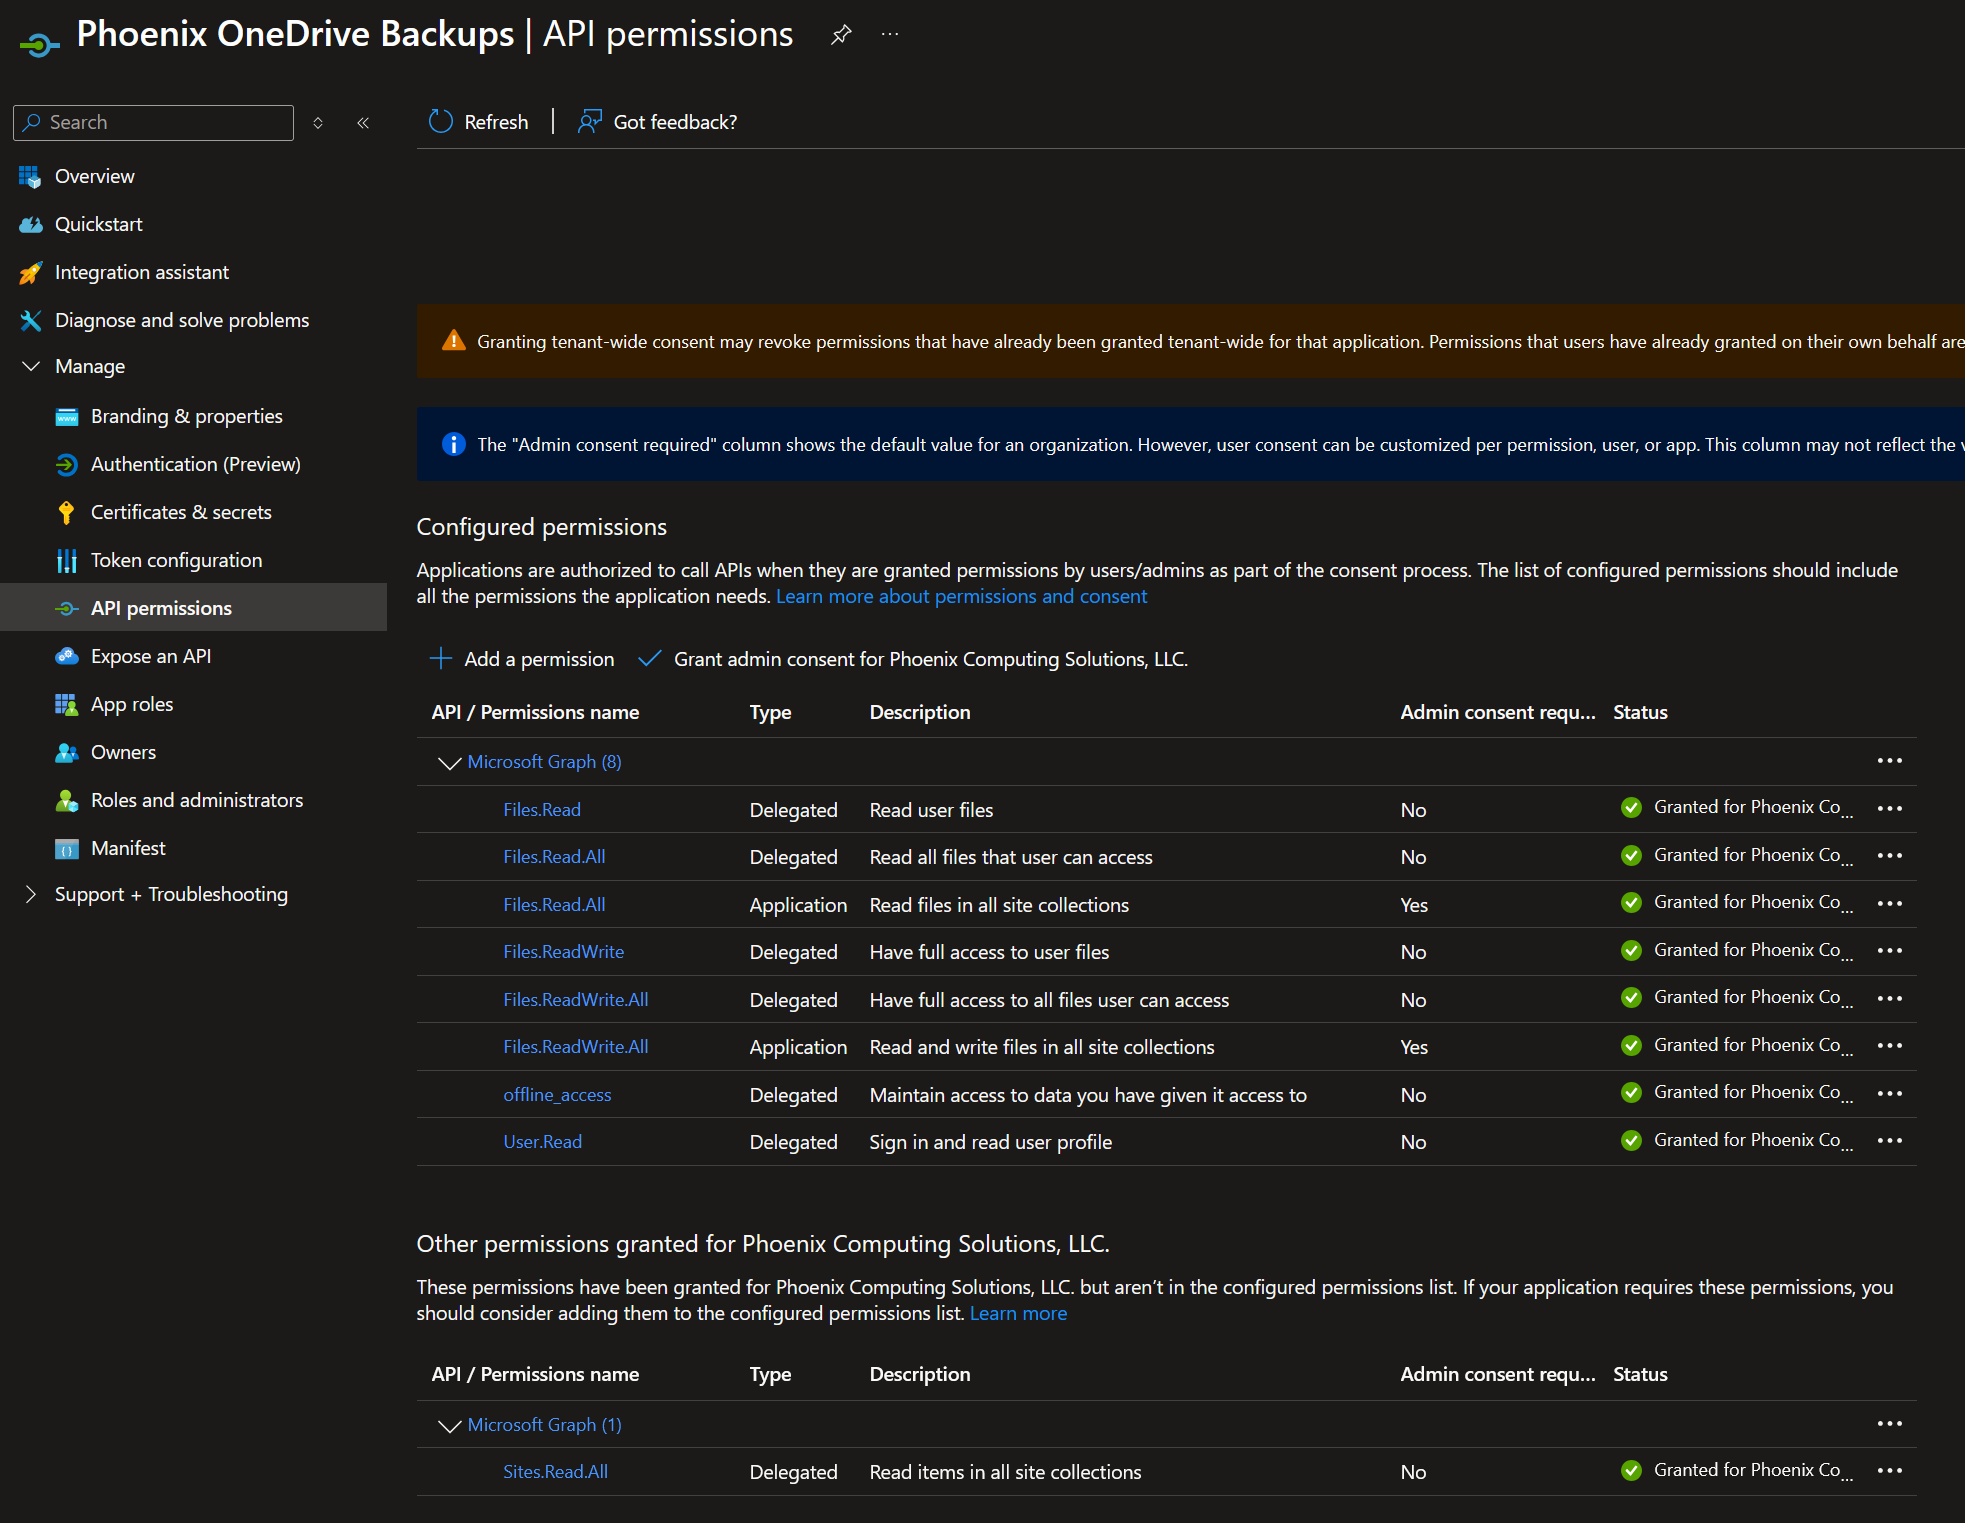
Microsoft Graph permissions used by the custom Entra app registration, including offline access for long-running rclone jobs.
Tenant-specific endpoints used:
https://login.microsoftonline.com/<tenant-id>/oauth2/v2.0/authorize
https://login.microsoftonline.com/<tenant-id>/oauth2/v2.0/token
That stabilized the authentication flow and solved the refresh-token problem cleanly.
9. OneDrive Backup Execution
Separate OneDrive remotes were maintained for separate datasets, such as od_<user1>_app and od_<user2>_app. Each remote pointed to a different OneDrive source, but both used the same S3 archive remote on the destination side.
The backup model used rclone copy, not rclone sync.
- copy sends new or changed files to the destination
- copy does not delete destination files that are missing from the source
- that behavior is safer for backup convergence and long-term archive protection
For the OneDrive backup jobs, the command pattern looked like this:
rclone copy od_<user1>_app:/ aws_archive:phoenix-backup-archive/onedrive-<user1> \
  --fast-list \
  --transfers 8 \
  --checkers 8 \
  --progress \
  --log-file ~/rclone-logs/backup-<user1>.log \
  --log-level INFO
The same model was used for the second OneDrive dataset:
rclone copy od_<user2>_app:/ aws_archive:phoenix-backup-archive/onedrive-<user2> \
  --fast-list \
  --transfers 8 \
  --checkers 8 \
  --progress \
  --log-file ~/rclone-logs/backup-<user2>.log \
  --log-level INFO
Validation used rclone's own source and destination comparison tools rather than relying on visual usage bars in the cloud console.
rclone size od_<user1>_app:/
rclone size od_<user2>_app:/

rclone check od_<user1>_app:/ aws_archive:phoenix-backup-archive/onedrive-<user1> --size-only
rclone check od_<user2>_app:/ aws_archive:phoenix-backup-archive/onedrive-<user2> --size-only
The rule became simple: trust rclone validation, not the pretty usage bar.
10. EC2 Automation
Once the OneDrive backup commands were proven manually, they were converted into repeatable shell scripts on the EC2 staging box. Each dataset received its own script so logging, destination paths, and troubleshooting stayed clean.
The automation model was intentionally simple:
- Create a shell script per dataset
- Embed the rclone remote, S3 destination, logging path, and copy flags
- Run the script manually until it completed successfully
- Validate the result with
rclone sizeandrclone check --size-only - Only then schedule it with cron
A cron job that has not survived real manual execution is not automation. It is roulette.
The script pattern looked like this:
#!/bin/bash

rclone copy od_<user1>_app:/ aws_archive:phoenix-backup-archive/onedrive-<user1> \
  --fast-list \
  --transfers 8 \
  --checkers 8 \
  --log-file ~/rclone-logs/backup-<user1>.log \
  --log-level INFO
The second dataset used the same structure with a different source remote, destination prefix, and log file:
#!/bin/bash

rclone copy od_<user2>_app:/ aws_archive:phoenix-backup-archive/onedrive-<user2> \
  --fast-list \
  --transfers 8 \
  --checkers 8 \
  --log-file ~/rclone-logs/backup-<user2>.log \
  --log-level INFO
After the scripts were stable, they were scheduled every six hours in a staggered pattern. That created a convergence loop where each run reduced drift between OneDrive and the S3 archive without requiring a destructive sync operation.
# Example staggered cron schedule

0 */6 * * * /home/ubuntu/rclone-scripts/backup-<user1>.sh
30 */6 * * * /home/ubuntu/rclone-scripts/backup-<user2>.sh
The staggered schedule kept the jobs from competing with each other while still ensuring both OneDrive datasets were checked and copied multiple times per day.
11. NAS Ingest Strategy
The NAS footprint is large enough that it had to be treated as a phased ingestion project rather than a casual cloud upload. With tens of terabytes of data involved, the initial upload path mattered just as much as the backup destination.
Home upload bandwidth was extremely poor, which made full direct ingest from home impractical for bulk seeding. Trying to push the entire NAS directly from home would have turned the first backup into a never-ending transfer instead of a controlled archive project.
The practical solution was to separate the initial bulk seed from the ongoing delta maintenance:
- Copy a manageable chunk of NAS data to external disk
- Take the disk to a high-bandwidth location
- Upload that seeded dataset into the S3 archive
- Validate the uploaded data
- Use the NAS/rclone process later for checks, deltas, and ongoing maintenance
This approach avoided trying to brute-force the entire project through a weak home upload connection. Bulk data movement was handled where bandwidth was available, while the NAS remained responsible for long-term validation and incremental convergence.
# High-level ingest model

NAS source data
  → external disk seed
  → high-bandwidth upload location
  → S3 archive bucket
  → Glacier Deep Archive lifecycle transition

Ongoing maintenance
  → NAS rclone check/copy jobs
  → size-only validation
  → delta correction as needed
This cleanly separated bulk seeding from ongoing delta maintenance. The first pass was about getting the data into the archive. Later passes were about proving it, correcting drift, and keeping the archive aligned over time.
12. Validation from Synology
Once rclone was running on the Synology, the NAS became more than just a source system. It also became a validation node. That mattered because the archive was not considered complete just because files existed in S3. The source and destination still needed to be compared.
The validation command used the Synology-mounted data path and compared it against the matching S3 prefix:
docker run --rm -it \
  -v /volume1/docker/rclone:/config/rclone \
  -v /volume1:/data \
  rclone/rclone check \
  "/data/Movies - NAS" \
  "aws_archive:phoenix-backup-archive/nas/Movies - NAS" \
  --size-only \
  --one-way \
  --fast-list \
  --checkers 4 \
  --log-file /config/rclone/logs/movies-check.log \
  --log-level INFO
The important validation flags were:
- --size-only compares file sizes instead of hashes, which is useful when comparing large NAS data against S3 where hashing every object can be expensive or impractical.
- --one-way checks whether the destination has what the source expects without treating extra destination-side objects as immediate failures.
- --fast-list improves performance when listing large object sets.
- --checkers 4 limits parallel checks to keep the process controlled on the NAS.
A full check against Movies - NAS showed two categories of findings. Some were Synology sidecar artifacts, such as indexing or metadata files that do not need to be preserved in the archive. Others were genuinely missing payload files, which proved the copy was not fully converged yet.
# Examples of Synology-generated artifacts excluded or ignored during backup validation

**/@eaDir/**
**/#recycle/**
**/.DS_Store
**/Thumbs.db
**/SYNOINDEX_MEDIA_INFO/**
That result was useful, not a failure. It showed the validation layer doing its job. The system identified that the dataset was not fully converged, which meant lifecycle transition should not be treated as the final proof of a complete backup.
The system did exactly what it was supposed to do: it prevented an incomplete dataset from being blindly accepted as finished.
13. Full Fidelity Backup Decision
After the Synology validation checks exposed both normal payload files and Synology-generated sidecar artifacts, I had to make a design decision about what this archive was supposed to be.
There were two valid paths:
- Exclude Synology-generated metadata and keep the backup cleaner
- Back up everything exactly as it exists on the NAS
The cleaner option would reduce object count, reduce noise in validation reports, and avoid preserving files that were not directly created by me. That would make the archive look better, but it would also mean the S3 copy was no longer a true representation of the NAS.
The final decision was to back up everything, including:
- Media files
- Sidecar files
- Indexing metadata
- Synology-generated directory artifacts
- Any other files present in the source folder structure
That decision increases object count and creates more noise during review, but it aligns with the actual disaster-recovery goal. If the NAS ever has to be rebuilt from the archive, I do not want to be guessing which supporting files mattered and which ones did not.
# Final backup philosophy

If it exists in the source dataset,
it belongs in the archive.

The backup target should represent the NAS as-is,
not a manually cleaned interpretation of it.
This changed the archive from a curated media backup into a full-fidelity recovery copy. It may not be the prettiest approach, but it is the safer one for a rebuild scenario.
14. Synology-native rclone via Docker
For the NAS side of the architecture, rclone was run directly on the Synology using Docker. That kept the setup portable and avoided needing to install rclone directly into the Synology operating system.
The container model was simple:
- Mount the NAS storage into the container as
/data - Mount the rclone config and log directory into the container as
/config/rclone - Run rclone from the container against the mounted NAS paths
- Write logs back to the persistent rclone folder on the Synology
The basic Docker pattern looked like this:
docker run --rm -it \
  -v /volume1/docker/rclone:/config/rclone \
  -v /volume1:/data \
  rclone/rclone [rclone-command]
That mount structure made the Synology folder tree available inside the container under /data. For example, a NAS folder that exists on the Synology as:
/volume1/Movies - NASbecame available to rclone inside the container as:
/data/Movies - NASThe Synology has multiple storage volumes, so the container mount strategy matters. In this setup, /volume1 was mounted into the rclone container as /data. Any folders living on Volume 2 need to be handled with their own mount path or a separate command that maps /volume2 into the container as well.
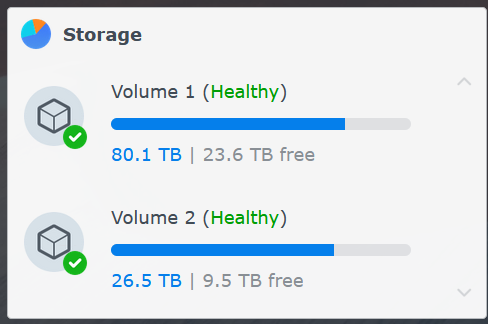
Synology storage is split across Volume 1 and Volume 2, so rclone container mounts must match where the source folders actually live.
The rclone configuration and logs persisted outside the container under the Docker config path:
/volume1/docker/rclone
/volume1/docker/rclone/logs
This allowed both direct copies and direct checks from the NAS itself. The Synology could act as the source for ongoing archive maintenance, and it could also validate whether S3 contained the expected objects.
For the NAS, Docker provided the cleanest balance: rclone stayed containerized, logs and configuration remained persistent, and the NAS data could be presented to the container without changing the underlying Synology installation.
15. Scheduled Tasks for NAS Folders
Once the Docker-based rclone model was working on the Synology, the next step was preparing scheduled tasks for the NAS folders that would eventually be maintained directly from the NAS.
Scheduled Synology tasks were prepared for:
- docker
- Documents
- music
- photo
- Plex
- PlexMediaServer
- reports
- TV Shows - NAS
- UHD - TV Shows
- video
- web
- web_packages
Each task follows the same basic containerized rclone pattern: mount the rclone configuration, mount the NAS volume, copy the selected folder to the matching S3 prefix, and write logs back to the Synology.
docker run --rm \
  -v /volume1/docker/rclone:/config/rclone \
  -v /volume1:/data \
  rclone/rclone copy \
  "/data/<folder-name>" \
  "aws_archive:phoenix-backup-archive/nas/<folder-name>" \
  --fast-list \
  --transfers 4 \
  --checkers 4 \
  --log-file /config/rclone/logs/<folder-name>.log \
  --log-level INFO
The scheduled task model keeps each folder independent. That makes it easier to troubleshoot failures, review logs, rerun a single folder, or temporarily disable a noisy job without impacting the rest of the backup plan.
Because current home upload bandwidth is weak, these tasks were prepared but not treated as aggressive always-on bulk transfer jobs yet. The near-term goal is controlled validation and incremental convergence, not trying to brute-force the entire NAS through a constrained upload pipe.
Once better upload bandwidth is available, the same task structure can be used more aggressively. Until then, the schedule remains a controlled framework for maintaining the archive without overwhelming the connection.
16. Cloudflare Tunnel for EC2
At this point, the project shifted from backup storage and data movement into the access layer. Sections 16 through 20 cover the Zero Trust Network Access side of the build: reaching infrastructure without exposing inbound services directly to the internet. Section 21 then moves into Synology SSO, which is identity-based access to DSM itself rather than a network tunnel.
Cloudflare Tunnel was used to reach the EC2 backup host without exposing SSH publicly. This established the access-plane pattern reused elsewhere: identity-gated access, no exposed inbound ports, and Cloudflare Access sitting in front of administrative entry points.
The goal was simple: the EC2 instance needed to be reachable for administration, but SSH did not need to be open to the world.
- No public inbound SSH rule required
- No direct exposure of port 22
- Access brokered through Cloudflare Tunnel
- Authentication and access policy handled through Cloudflare Access
- Administrative access tied to identity instead of source IP alone
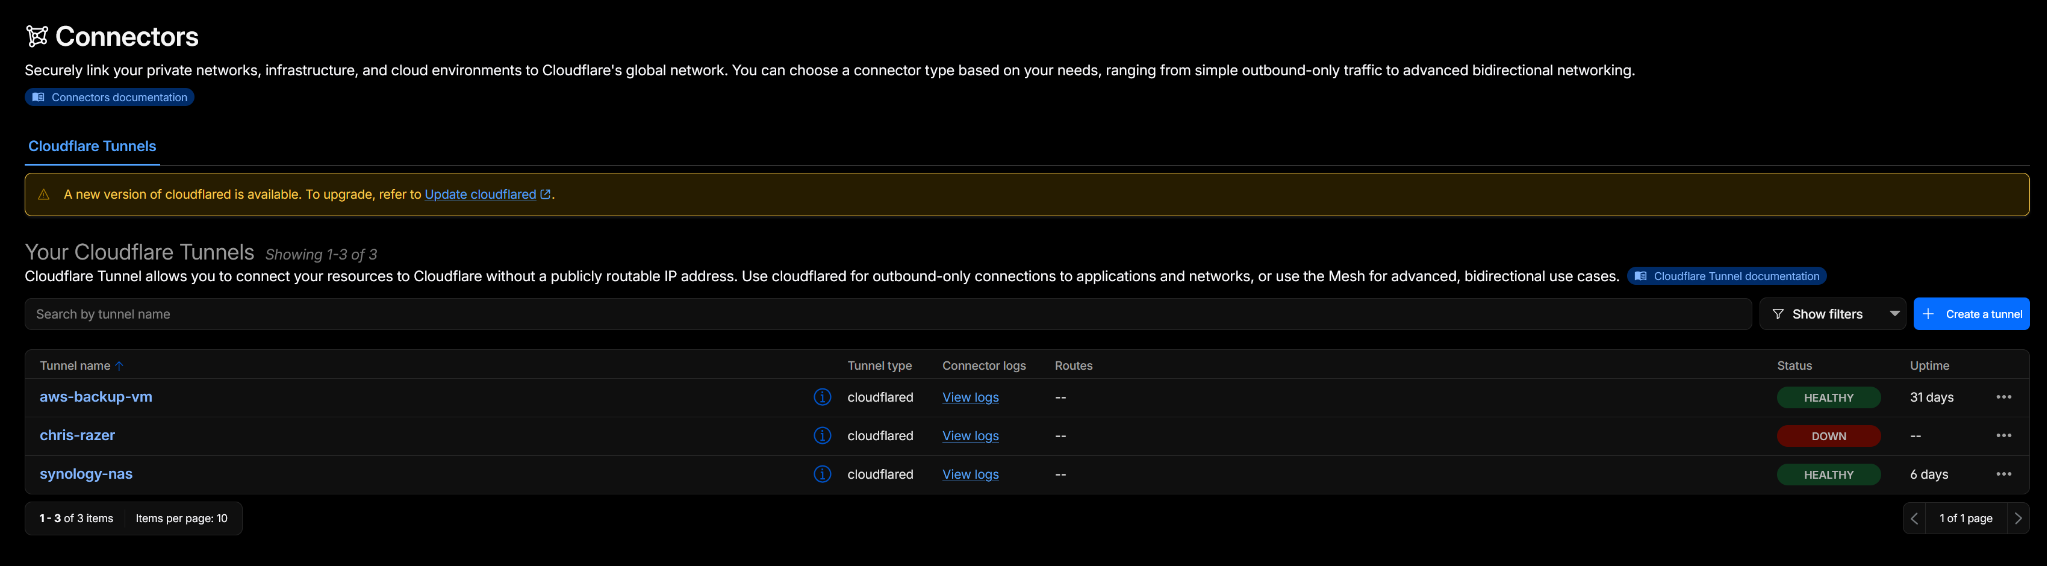
Cloudflare Tunnel connectors provide outbound-only connectivity from the EC2 backup host and Synology NAS into Cloudflare.
The EC2 tunnel route mapped the public hostname to SSH on the local EC2 instance:

Cloudflare Tunnel maps the EC2 backup hostname to SSH on the private staging host without exposing port 22 publicly.
tunnel: aws-backup-vm
credentials-file: /home/ubuntu/.cloudflared/<tunnel-id>.json

ingress:
  - hostname: aws-backup-vm.phoenix-comp.com
    service: ssh://localhost:22
  - service: http_status:404
Cloudflare Access was then layered in front of that hostname so the administrative path required identity validation before SSH access was allowed.
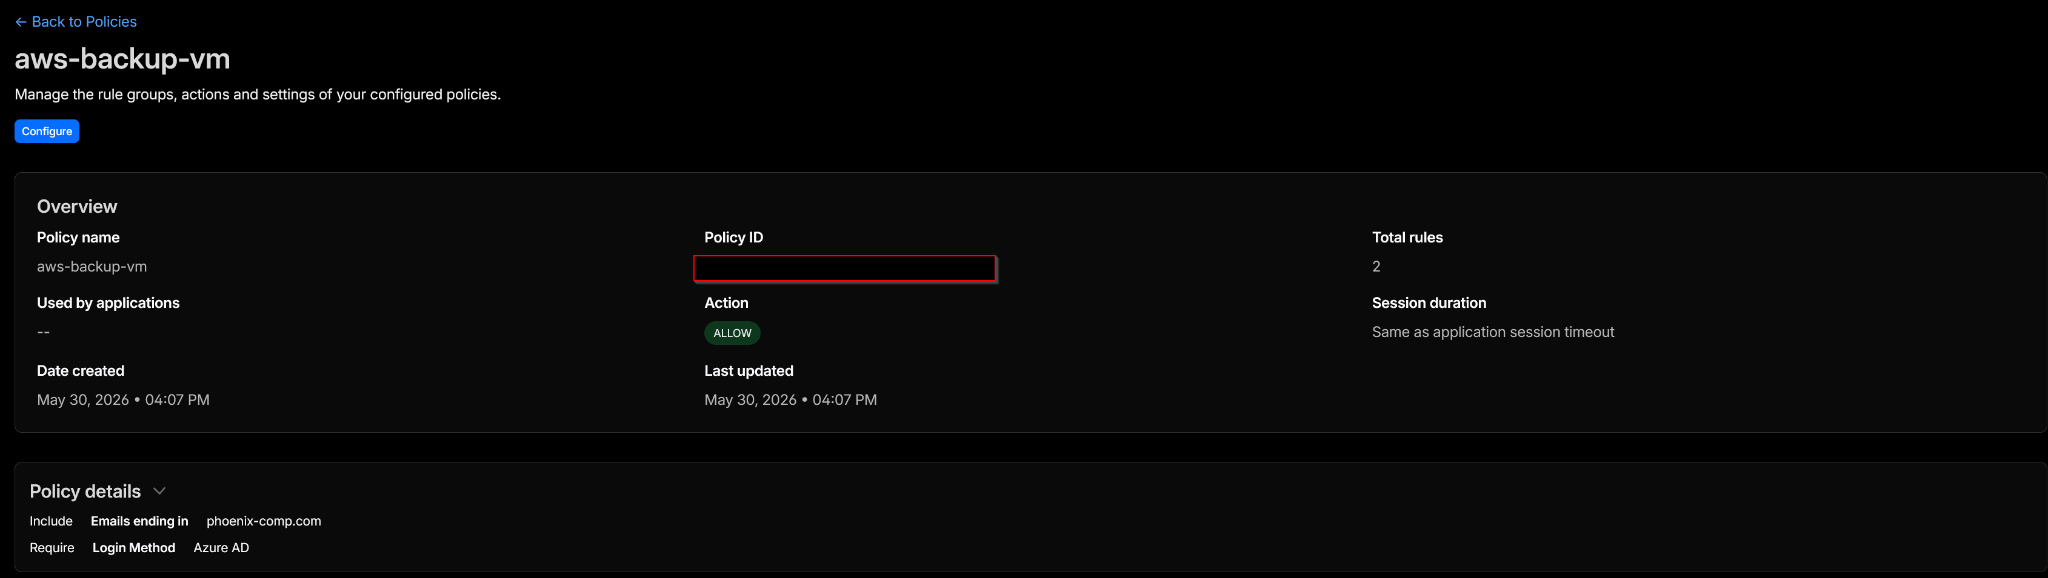
Cloudflare Access adds the identity gate in front of the EC2 administrative path.
The tunnel setup pattern looked like this:
cloudflared tunnel login

cloudflared tunnel create aws-backup-vm

cloudflared tunnel route dns aws-backup-vm aws-backup-vm.phoenix-comp.com
Once the tunnel was created and routed, the Cloudflare service was installed so the tunnel would survive reboots:
sudo cloudflared service install
sudo systemctl enable cloudflared
sudo systemctl start cloudflared
sudo systemctl status cloudflared
That gave the EC2 staging box a secure administrative access path without requiring public SSH exposure. From an architecture standpoint, this became the access model for the rest of the project: keep services private, publish only the Cloudflare-controlled entry point, and put identity policy in front of it.
17. Cloudflare Tunnel for Windows RDP Host
A Windows system was also tunneled through Cloudflare for RDP access. This reused the same Zero Trust Network Access pattern from the EC2 host: keep the service off the public internet, route access through Cloudflare Tunnel, and place Cloudflare Access policy in front of the administrative entry point.
The purpose was not to publish RDP directly. The purpose was to make RDP reachable through a controlled Cloudflare path without opening inbound RDP to the internet.
- No public inbound RDP rule required
- No direct exposure of port 3389
- RDP access routed through Cloudflare Tunnel
- Cloudflare Access policy applied to the hostname
- Persistence handled by running the tunnel as a service
The Windows tunnel route followed the same published-application pattern:
hostname: chris-razer.phoenix-comp.com
service: rdp://localhost:3389
One of the bigger lessons was that localhost and 127.0.0.1 are not always interchangeable in real troubleshooting. If the tunnel route is correct but the connection still fails, verify what address and port the Windows service is actually listening on.
Useful validation checks included confirming that RDP was enabled, confirming the listener was active, and confirming the local port was reachable before blaming Cloudflare.
# Confirm RDP listener locally on Windows

netstat -ano | findstr :3389

# Confirm Remote Desktop service state

sc query TermService
Once the local RDP listener was confirmed, the remaining work was Cloudflare-side: publish the route, verify the Access application, apply the correct policy, and make sure the tunnel stayed running persistently.
cloudflared tunnel login

cloudflared tunnel create chris-razer

cloudflared tunnel route dns chris-razer chris-razer.phoenix-comp.com

cloudflared service install
cloudflared service start
The final result was RDP access that did not require exposing RDP directly to the internet. The system stayed private, Cloudflare handled the route, and Access policy controlled who could reach the administrative path.
18. Cloudflare Tunnel for Synology DSM
The Synology DSM interface was also tunneled through Cloudflare. This followed the same access pattern as the EC2 and Windows systems: keep the service private, route access through Cloudflare Tunnel, and avoid exposing the NAS directly to the public internet.
The DSM hostname was published through a redacted Cloudflare-managed subdomain:
<redacted-subdomain>.phoenix-comp.comThe build process was:
- Run
cloudflared tunnel login - Create the tunnel
- Route DNS to the DSM hostname
- Create
config.yml - Run the tunnel manually first
- Test Cloudflare Access and DSM reachability
- Convert the working tunnel into a persistent detached container
The initial login and tunnel creation were run from Docker on the Synology:
docker run --rm -it \
  --user root \
  -v /volume1/docker/cloudflared:/root/.cloudflared \
  cloudflare/cloudflared:latest \
  tunnel login

docker run --rm -it \
  --user root \
  -v /volume1/docker/cloudflared:/root/.cloudflared \
  cloudflare/cloudflared:latest \
  tunnel create synology-nas

docker run --rm -it \
  --user root \
  -v /volume1/docker/cloudflared:/root/.cloudflared \
  cloudflare/cloudflared:latest \
  tunnel route dns synology-nas <redacted-subdomain>.phoenix-comp.com
The final tunnel configuration pointed the Cloudflare hostname to the DSM HTTPS service on the NAS:
tunnel: <tunnel-id>
credentials-file: /root/.cloudflared/<tunnel-id>.json

ingress:
  - hostname: <redacted-subdomain>.phoenix-comp.com
    service: https://<synology-lan-ip>:<dsm-port>
    originRequest:
      noTLSVerify: true
  - service: http_status:404
After manual testing succeeded, the tunnel was converted into a persistent detached Docker container:
docker run -d \
  --name cloudflared-synology \
  --restart unless-stopped \
  --user root \
  --network host \
  -v /volume1/docker/cloudflared:/root/.cloudflared \
  -v /volume1/docker/cloudflared/config:/etc/cloudflared \
  cloudflare/cloudflared:latest \
  tunnel --config /etc/cloudflared/config.yml run
Key lessons from that build:
- The certificate location mismatch initially caused login artifacts to land in the wrong place.
- The JSON tunnel credentials belonged in the main
cloudflareddirectory, not theconfigsubfolder. - Using the tunnel ID in the configuration was the safest route.
- The initial DSM port was wrong; correcting the port made the origin reachable.
- The tunnel should be tested manually before turning it into a persistent container.
Final result: DSM became reachable through Cloudflare Access without exposing the NAS directly to the public internet.
19. Cloudflare Access Policy Model
Once the tunnels were in place, the important control became the Cloudflare Access policy model. The tunnel creates the private path to the service, but Access determines who is allowed to use that path.
The policy model used three main controls:
- Microsoft / Entra login method
phoenix-comp.comdomain restriction- MFA requirement through the Microsoft identity flow
Email OTP was unreliable and unnecessary in a Microsoft-heavy environment. Since the users and authentication controls already lived in Microsoft Entra, using Entra as the login method was the better fit.
This kept the access model consistent:
- Cloudflare Tunnel handled private connectivity
- Cloudflare Access enforced the front-door policy
- Microsoft Entra handled identity and MFA
- The protected services stayed off the public internet
The end result was cleaner than relying on one-off OTP behavior. Administrative access was tied back to the same identity provider already used elsewhere in the environment, which made the policy easier to reason about and easier to maintain.
Access model:

User
  → Cloudflare Access
  → Microsoft / Entra authentication
  → MFA
  → Cloudflare Tunnel
  → Private service
That became the standard model for the tunneled administrative services in this project: private origin, Cloudflare-controlled route, and Microsoft-backed identity enforcement.
20. Entra App Registration for Cloudflare Access
Separate from the rclone OneDrive app registration, a second Microsoft Entra app registration was used for Cloudflare Access. The OneDrive app handled rclone authentication to Microsoft Graph, while this app handled identity federation between Cloudflare Access and Microsoft Entra.
The important distinction is that this app was not for backup data movement. It was for access control. Cloudflare used it as the Microsoft login method for protected applications such as the EC2 SSH tunnel, Windows RDP tunnel, and Synology DSM tunnel.
The redirect URI had to match the exact Cloudflare team domain callback path:
https://<cloudflare-team-name>.cloudflareaccess.com/cdn-cgi/access/callbackIf that callback URI does not match exactly, the Microsoft login flow will fail even if the tunnel and Access policy are otherwise correct.
The Entra configuration model was:
- Create a dedicated Entra app registration for Cloudflare Access
- Configure the Cloudflare Access callback URI as the redirect URI
- Allow Cloudflare Access to use Microsoft as an identity provider
- Use Cloudflare Access policies to restrict access by domain, user, or group
- Let Microsoft Entra handle authentication and MFA
The Cloudflare side then referenced this Entra app as the Microsoft identity provider. That allowed the Cloudflare Access policy model to use Microsoft-backed identity instead of relying on email OTP.
Cloudflare Access
  → Microsoft Entra login method
  → Entra app registration
  → Cloudflare callback URI
  → Access policy evaluation
  → Protected tunnel application
This gave the tunnel access layer a cleaner authentication model. Cloudflare still controlled the application policy, but Microsoft Entra handled the actual identity proof and MFA workflow.
21. Synology SSO to Microsoft Entra
After getting DSM safely behind Cloudflare Tunnel, the next logical step was getting rid of yet another standalone local login workflow and tying DSM into Microsoft Entra for home-lab SSO. The goal here was not domain join, file share mapping, or anything that would require an added-cost service. The goal was simple: use the existing Entra tenant for DSM login without bolting on a paid identity tier.
The first pass used OIDC. That got far enough to prove the Microsoft login itself worked, but it ran into claim-mapping problems on the DSM side. The Entra sign-in would succeed, but DSM would not map the returned identity to the local NAS account the way it needed to. In this case, the local DSM account needed to match the username value DSM expected, while the Microsoft sign-in identity was still naturally email-shaped.
The clean pivot was to move from OIDC to SAML. That exposed the much more useful Entra-side Attributes & Claims controls and made it possible to send the exact username value DSM needed.
The SAML app configuration ended up using:
Identifier (Entity ID): https://<redacted-subdomain>.phoenix-comp.com
Reply URL (ACS URL): https://<redacted-subdomain>.phoenix-comp.com
Sign on URL: https://<redacted-subdomain>.phoenix-comp.com

Unique User Identifier (NameID): user.mailnickname
NameID format: Unspecified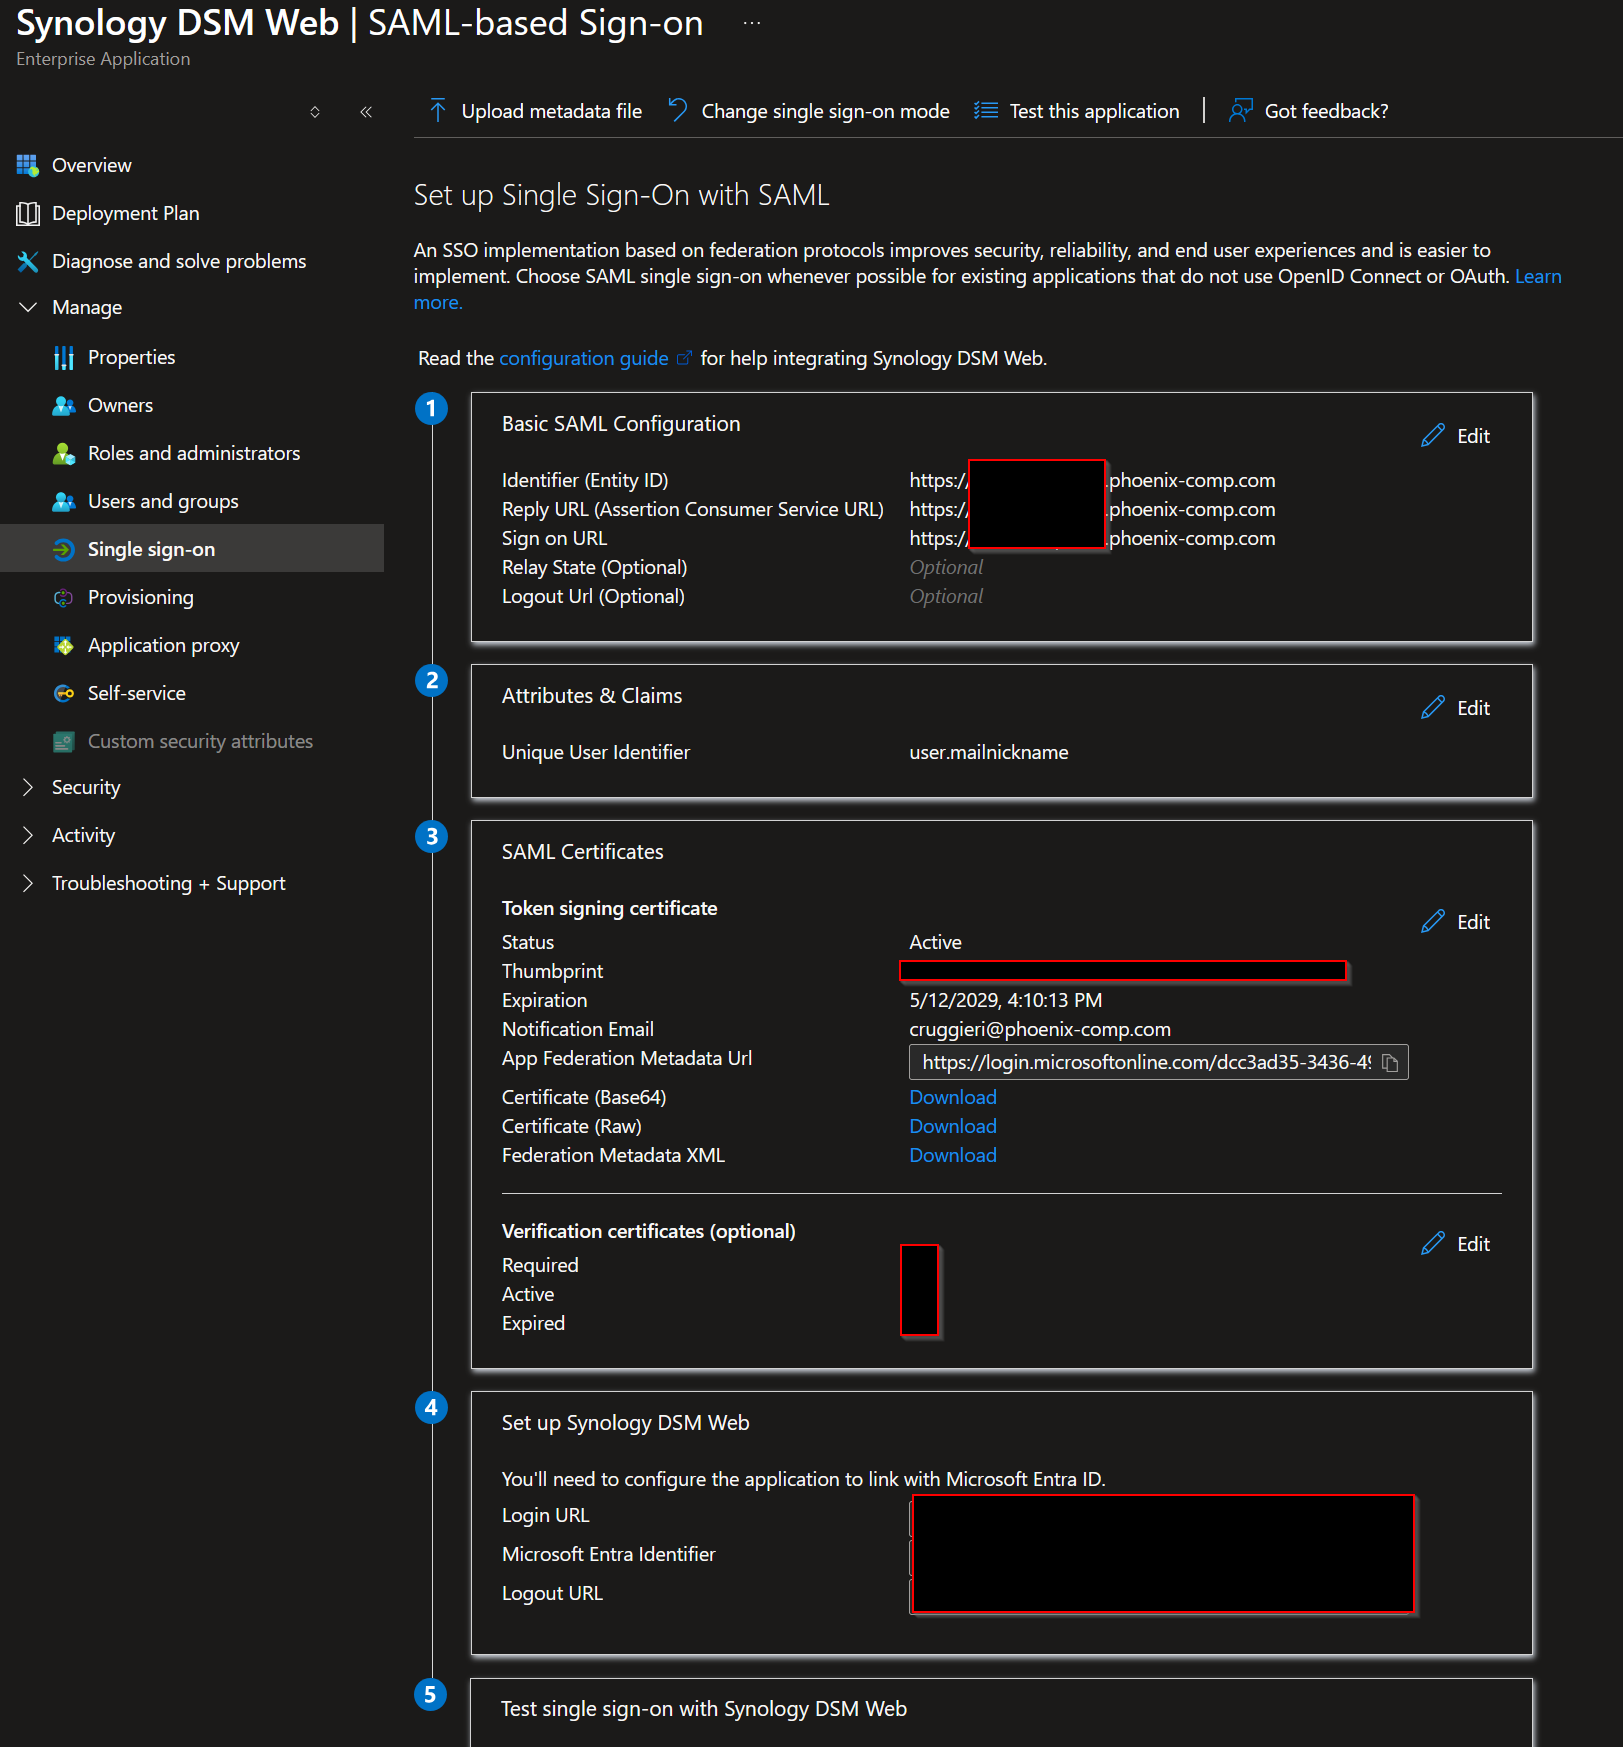
Microsoft Entra SAML configuration for Synology DSM Web, with tenant and hostname details redacted.
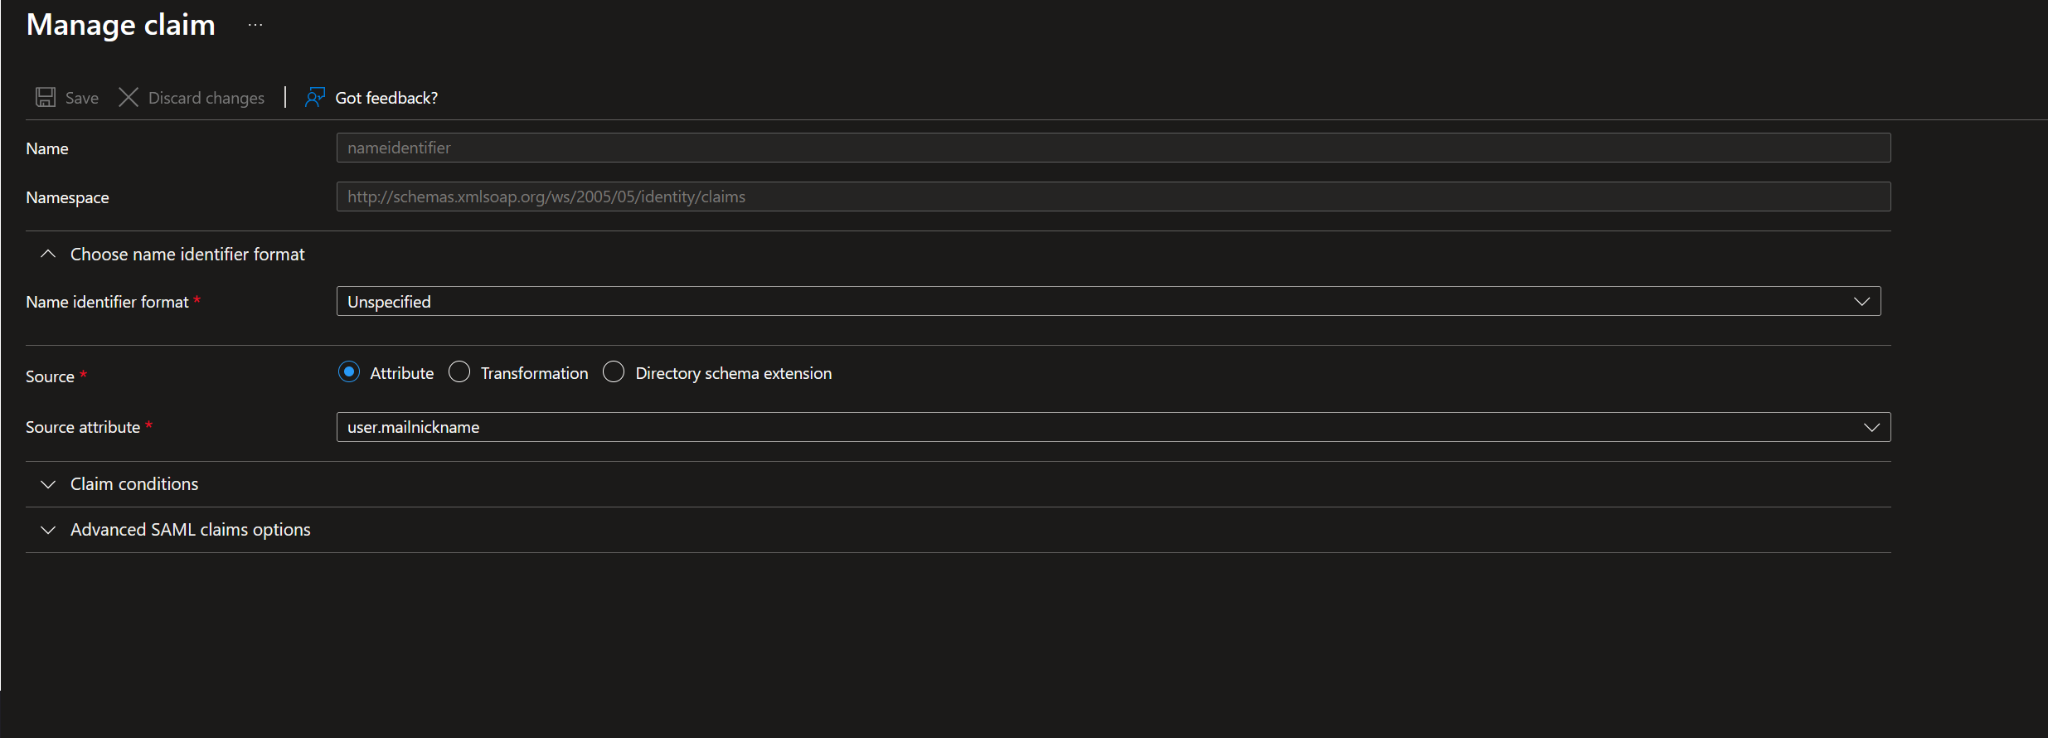
Entra claim mapping configured the NameID to use user.mailnickname, matching the local DSM username.
That meant the assertion being returned from Entra contained the DSM-compatible username value:
<NameID Format="urn:oasis:names:tc:SAML:1.1:nameid-format:unspecified"><local-dsm-username></NameID>At that point, the Entra side was correct. The sign-in logs all showed success, and the SAML assertion itself proved the NAS was being handed the exact username it needed.
The problem turned out to be on the DSM side and it was maddeningly specific: signature type.
DSM had originally been configured to expect:
Response signature verification: Sign SAML responseBut the actual Entra SAML payload was signing the Assertion, not the outer Response. In other words, the username was right, the audience was right, the recipient was right, the Microsoft authentication was right, and DSM was still rejecting the login because it was validating the wrong layer of the SAML message.
The fix was to change DSM to verify the signed Assertion instead of only the signed Response. Once that was corrected, the login worked.
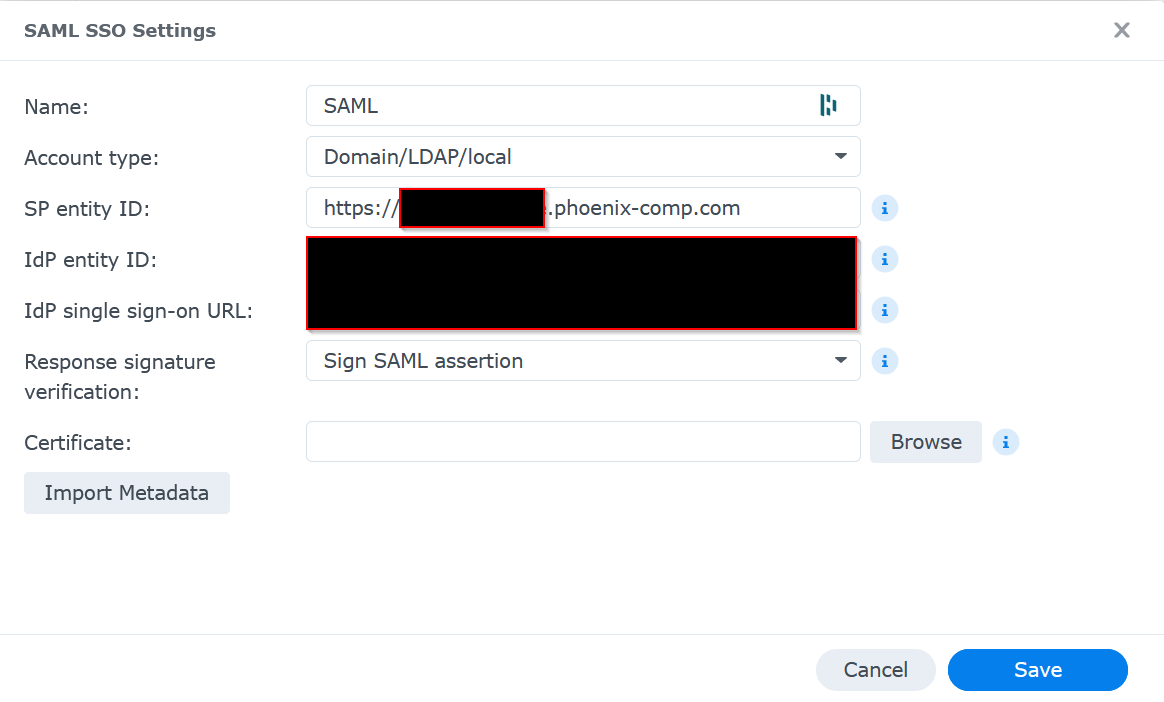
DSM had to verify the signed SAML assertion, not just the outer SAML response, before SSO would complete successfully.
That entire path is worth documenting for anyone trying to light up SSO in a home lab because it is exactly the kind of problem that wastes hours:
- Entra logs show success
- DSM still throws a generic failure
- The username claim looks correct
- The real issue is signature verification mode on the service provider
The practical lesson is simple: when troubleshooting SAML, do not stop at “the IdP says success.” Capture the assertion, inspect the NameID, inspect the Audience, inspect the Recipient, and confirm whether the identity provider is signing the Response, the Assertion, or both.
SAML troubleshooting checklist:

1. Confirm Entra sign-in success
2. Confirm DSM/local account username
3. Inspect NameID value
4. Confirm Audience / Entity ID
5. Confirm Recipient / ACS URL
6. Confirm whether the Response, Assertion, or both are signed
7. Match DSM signature verification mode to the actual signed SAML layer
For home lab builders, this is one of the bigger takeaways from the whole project: you can absolutely bring enterprise-style identity patterns into a personal environment without turning it into a six-figure science project. But once you do, you also inherit enterprise-style troubleshooting. The upside is that when you finally solve it, you end up with something a lot cleaner, safer, and frankly more satisfying than another pile of isolated local accounts.
22. Lessons Learned
- Prefix precision matters. S3 lifecycle rules are brutally literal.
- Validation matters more than intuition. A pretty console view is not proof that the archive is complete.
- Convergence beats perfection. Large backup sets do not have to be perfect on the first pass; they need to keep getting closer to correct.
- Identity is the perimeter. Administrative access should be tied to identity, not exposed ports.
- Bulk ingest and delta maintenance are different phases. Treating them the same creates pain.
- UI can lie. Usage bars and object views are helpful, but rclone validation is the source of truth.
- Archive economics only work if lifecycle is correct. Glacier Deep Archive is cheap because the lifecycle rules do the heavy lifting.
23. Current State
- OneDrive backups work and converge
- EC2 role-based S3 access works
- Non-EC2 S3 key-based access works
- Lifecycle rules work once prefixes are correct
- Data is transitioning to Glacier Deep Archive
- Synology validation works
- Synology direct copy works
- Cloudflare Tunnel works for EC2, Windows, and Synology
- Access policies work with Microsoft login and MFA
- Synology DSM SSO works with Microsoft Entra using SAML
This is no longer a lab experiment. It is an operating system.
24. Final Operating Model
Now
- Office / high-bandwidth location handles heavy seed copies
- EC2 handles OneDrive delta automation
- Synology handles validation and targeted catch-up
- Cloudflare secures access to the key systems
- Microsoft Entra provides the identity layer for Cloudflare Access and DSM SSO
Later, after better connectivity
- Synology becomes the primary long-term delta copy engine
- The same namespace alignment ensures only new or changed data moves
- The access model stays the same
- The lifecycle model stays the same
- The archive keeps converging without needing to redesign the system
25. Closing
This build was not about “copying files to the cloud.” It was about building a system that reduces cost over time, tolerates imperfect first runs, uses identity instead of perimeter exposure, preserves recoverability, and keeps converging without constant manual intervention.
It combines AWS S3, Glacier Deep Archive, rclone, Microsoft Entra, Cloudflare Tunnel, Cloudflare Access, Synology, Docker, and a lot of stubborn troubleshooting into something that behaves like an actual backup and access architecture.
That system now exists.